
Cavalex Models Class 60 – Driving the Detail
Cavalex Models are pleased to share the second shipment of our all new Class 60 has arrived!

Introduction
Following the highly successful delivery of our first batch of Class 60s back in early February, which included the ‘Super 60s’ and 60001, and with the second eagerly awaited batch of legacy machines having now arrived with us in the UK, we want to showcase what makes the Cavalex Models’ Class 60 locomotive so special, and why we would like you to join us on our journey of replicating this locomotive and many others in 4mm scale.
As a company, Cavalex Models consists primarily of two highly focused and obsessed railway modellers, with emphasis always being on the continual innovation and improvement of models in our great hobby. We pride ourselves on our meticulous pursuit of excellence when it comes to the accuracy and detail of our models; our brand-new Class 60 is no exception.
Through years of extensive research, including close collaboration with real railway operators and their working experts, refinement and iteration through our factory in China and our bespoke ‘driver experience’ sound file from ESU, we would like to share with you an in-depth article illustrating the intimate, often unknown, details of this fine scale model, comparing it to photographs of the real locomotive and highlighting some areas where this level of detail has not yet been seen on any other model of the class.
A dedicated visit last year to our factory in China to oversee the tooling and assembly process was essential for us to achieve our goal to do faithful justice to this great machine; this is evident in the many subtle differences and extra details that we have replicated in the model. From the shape of the loco to the sound file, as well as the individual locomotive specific details and printing, down to the innovative packaging and the accurately reproduced livery colours - we have replicated the real locomotive in miniature for our customers to enjoy for many years to come.
We hope you enjoy the following article on the Cavalex Models ‘Super’ Class 60 in OO scale and find the detail comparisons both interesting and inspirational.
Cav & Alex
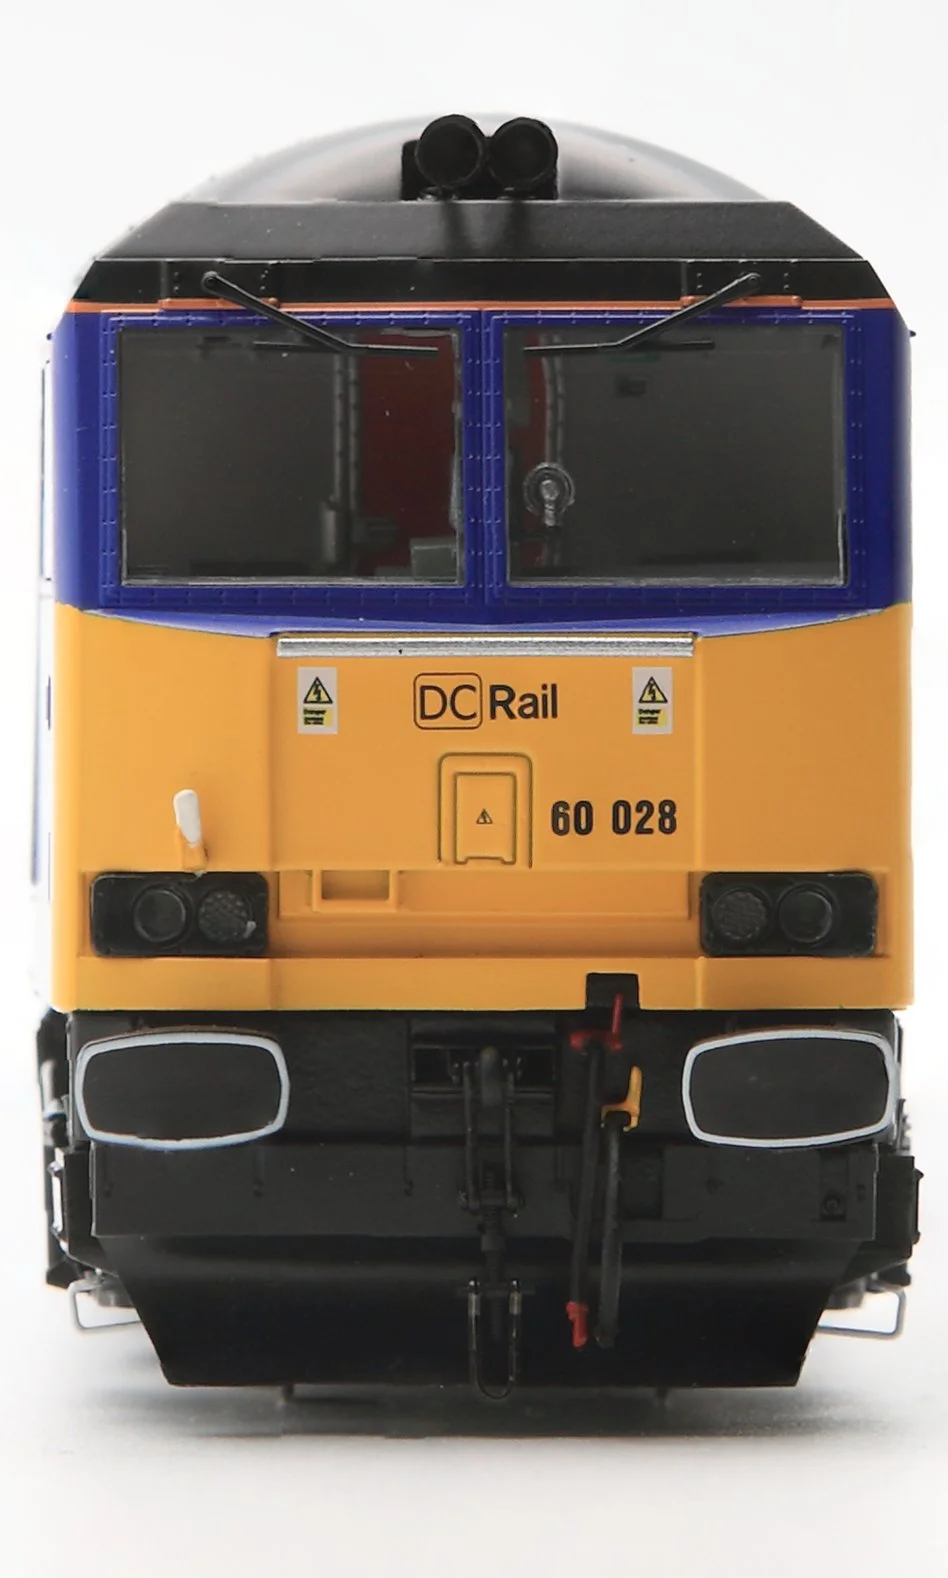
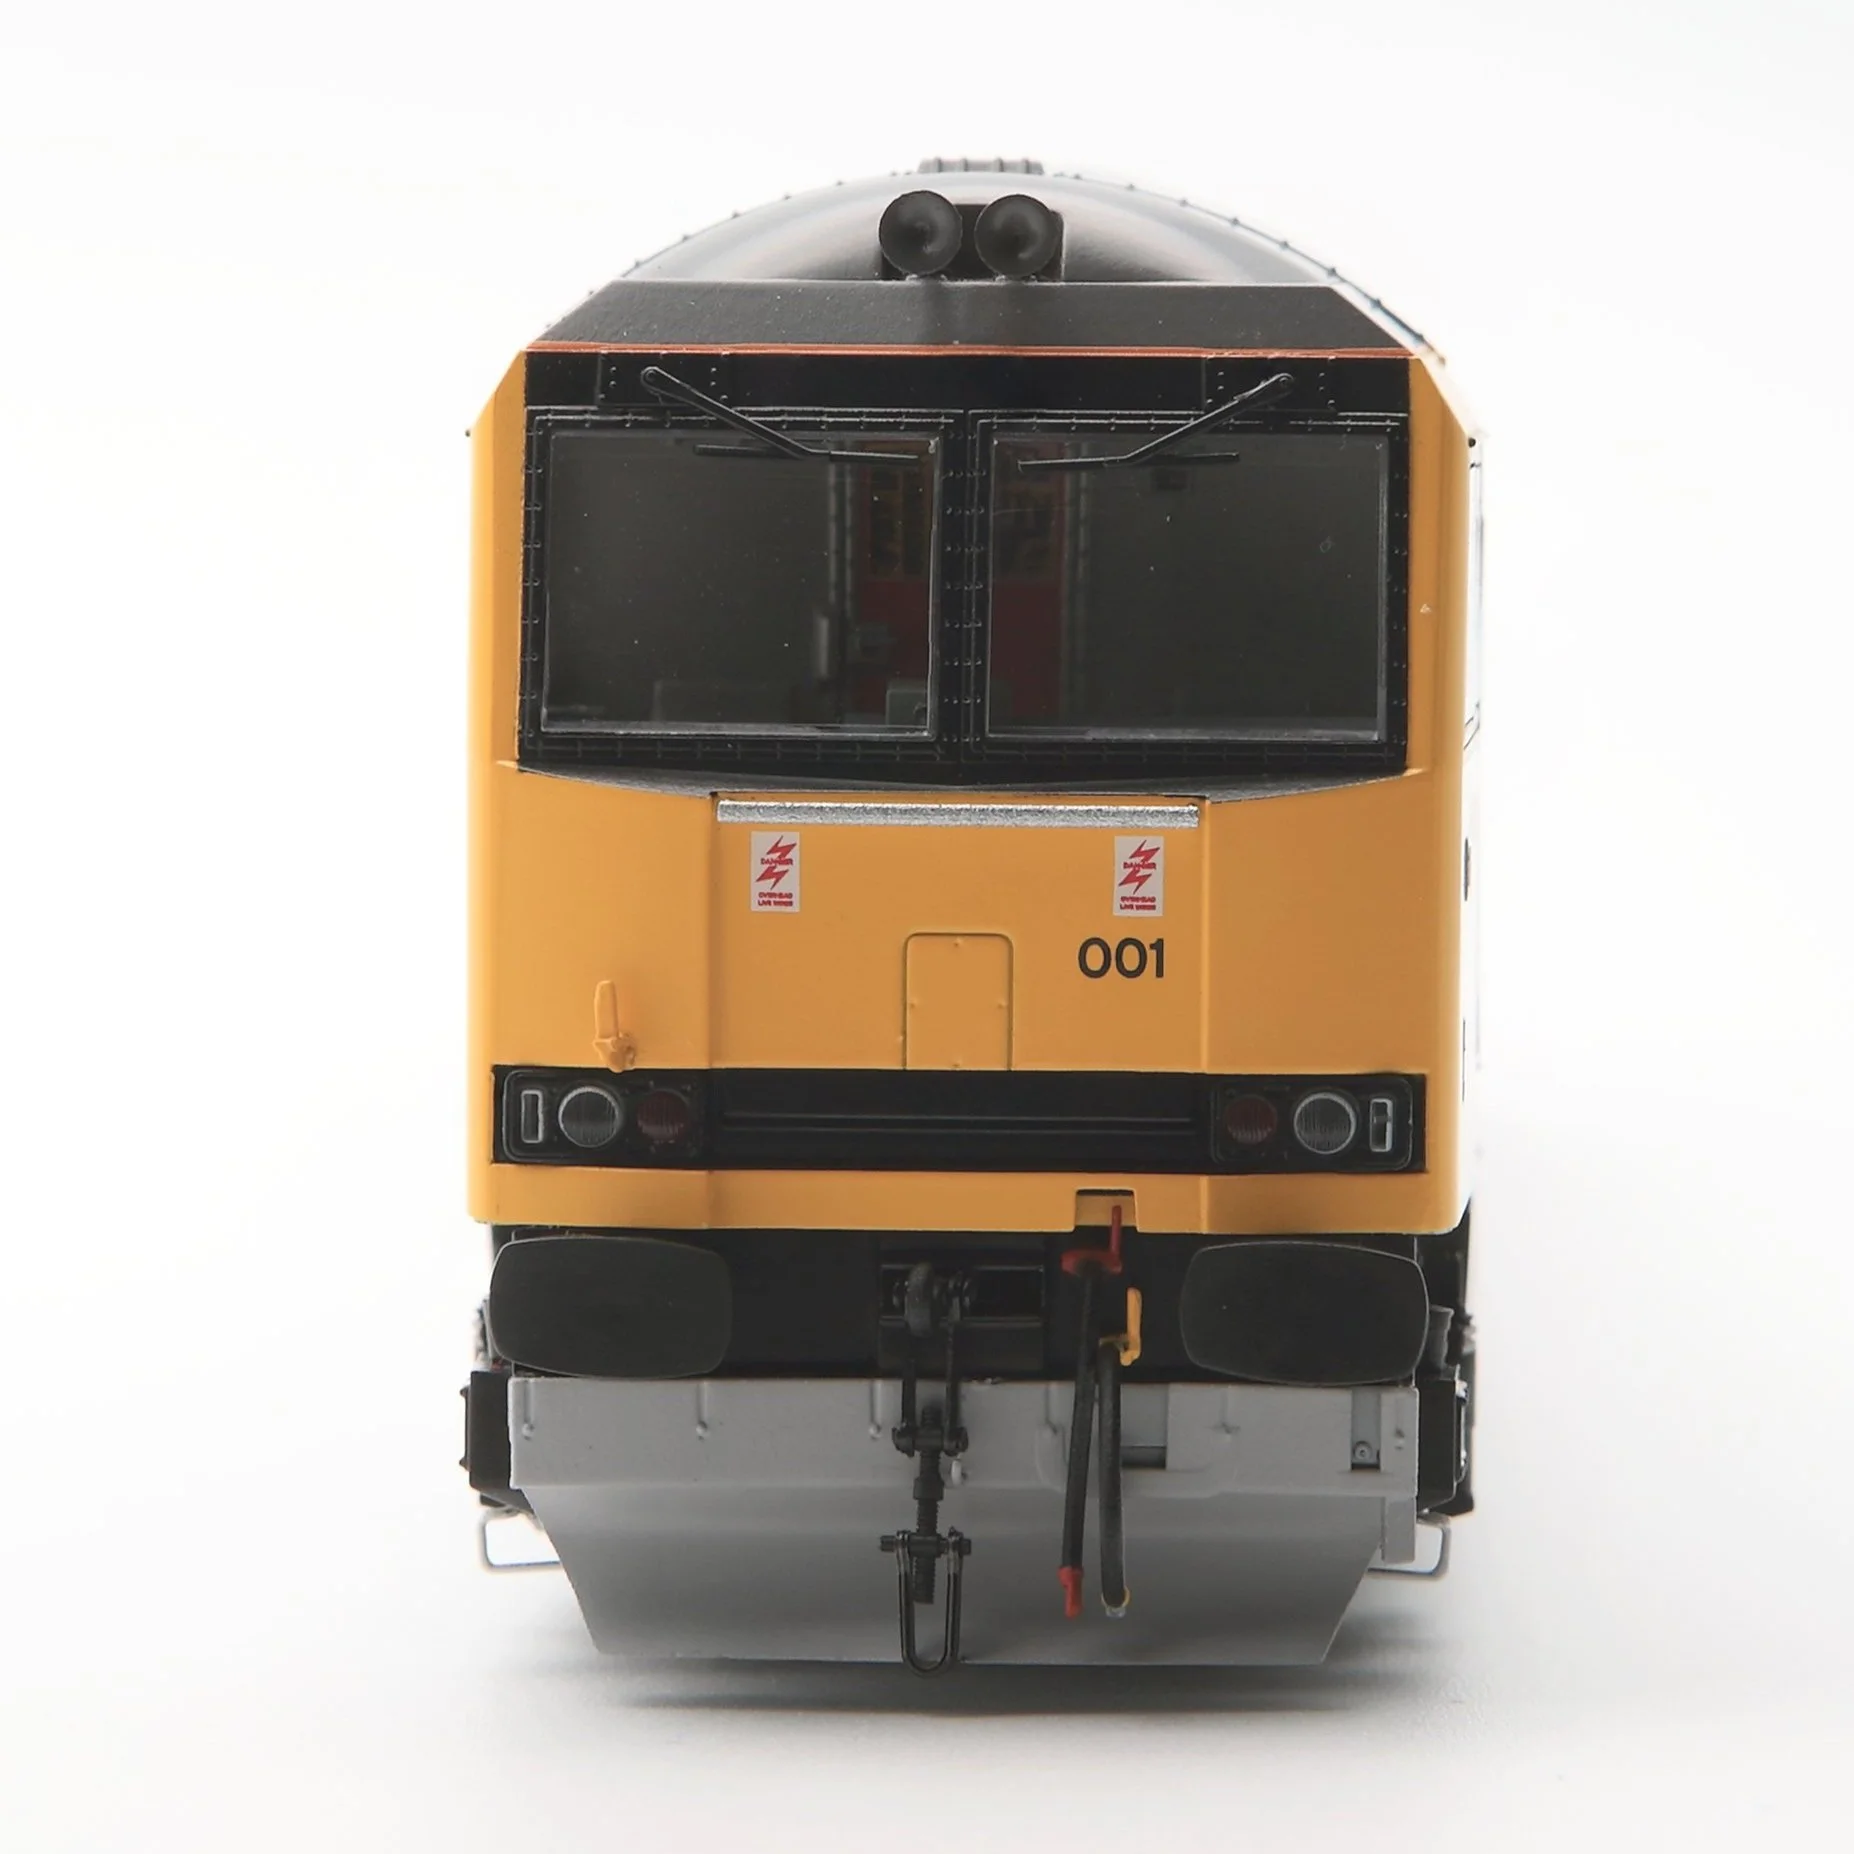
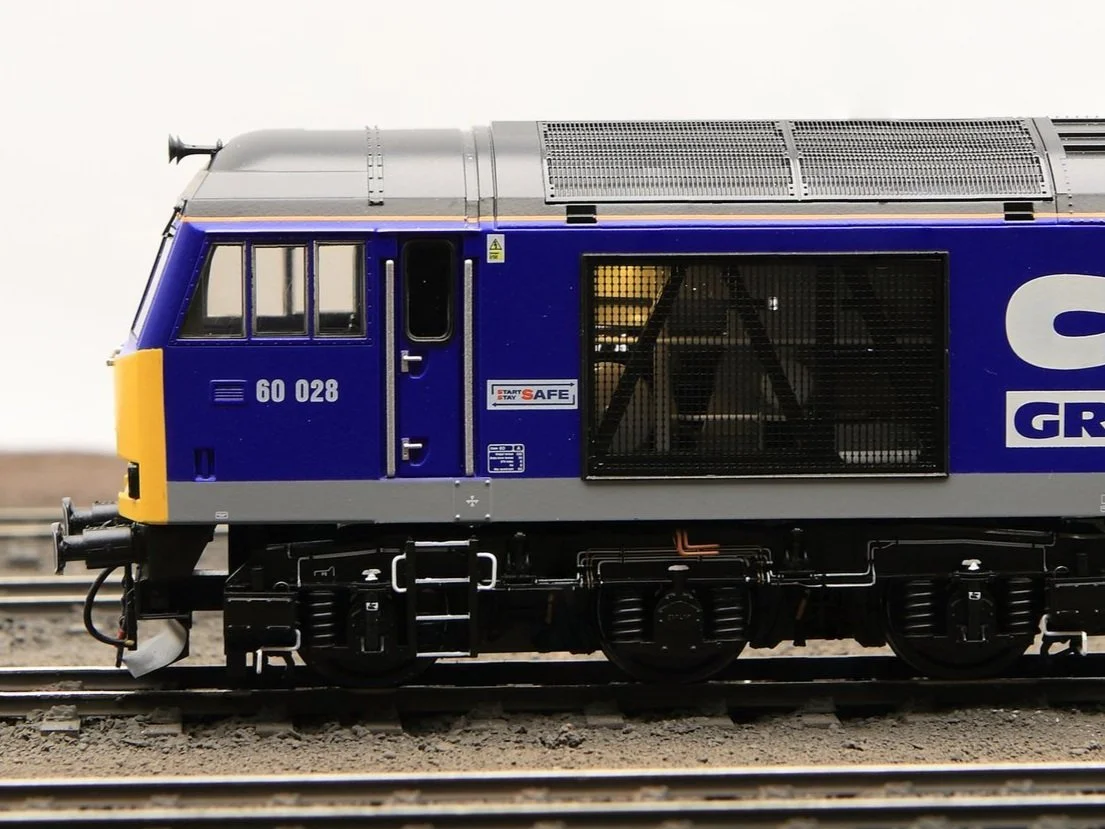
The ‘face of the loco’ - Cabs
Starting with the face of the loco, there are several differences here, especially with the pioneer locomotive of the Class, 60001 ‘Steadfast’ modelled as delivered to BR in 1989. This locomotive had several differences compared to the production loco and our model captures these in full, including the multiple working cover, being a full flat plate rather than a door as fitted later. This is replicated on the model with unique tooling as can be seen below versus 60027 with its later door:

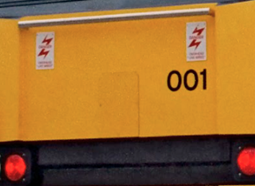
Photo Craig Simmons


The production locos had a door fitted in this position - which our ‘production’ versions of the 60 represent.
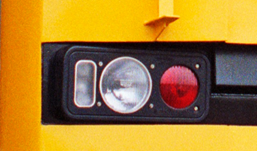
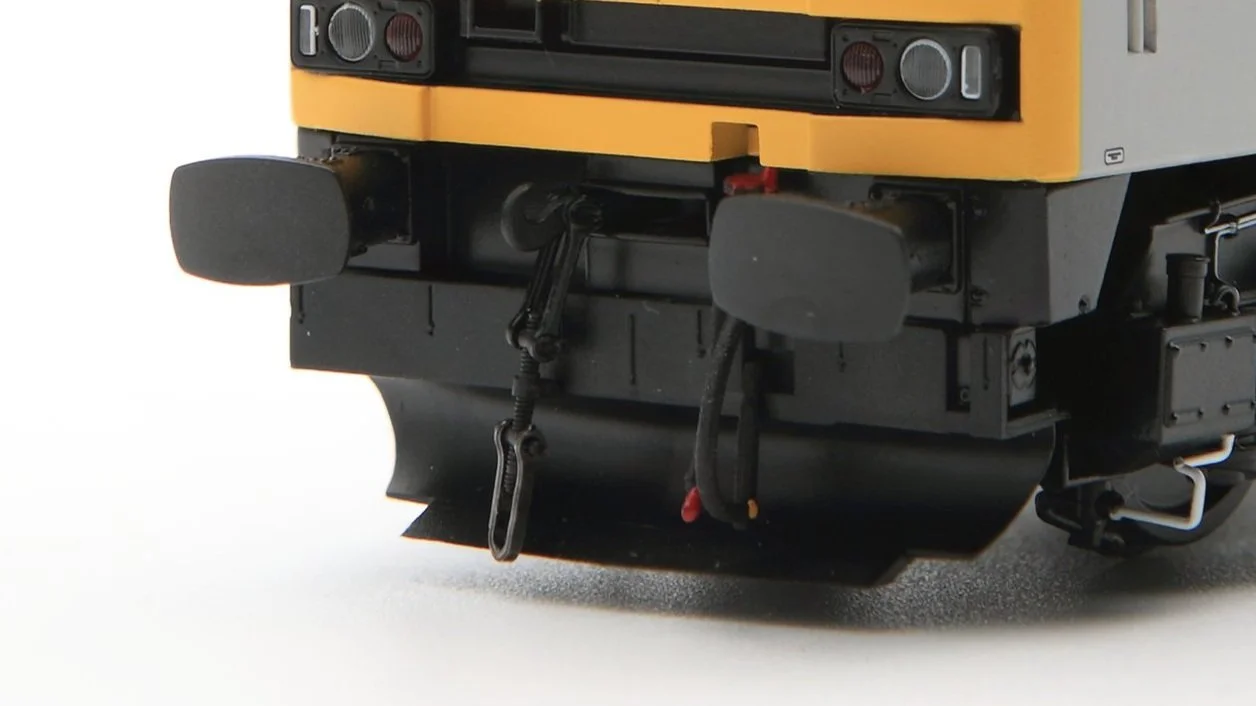
Lighting units
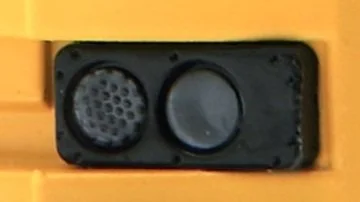
On 60001, and several other early locos, the BMAC lighting units utilised white silicon sealant around the marker and headlights - this is replicated on our model. For all of our Class 60s with the original style BMAC lighting we have also included red lenses for the tail lights, with the ribbing visible on all of the round light lenses.
BMAC from 60001 - Craig Simmons
The observant modellers may notice that the subtle surface detail of the BMAC unit itself is faithfully modelled including the screw head holes and recesses where the BMAC lettering is on the prototype. For later models the sealant is black and this has been replicated on the model - see the differences below between 60010 and 60028:

Original BMAC

Original BMAC Prototype
LED BMAC
LED BMAC Prototype
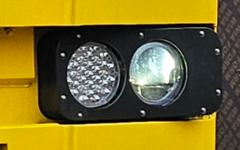
The differences between the standard BMAC and the LED style BMAC found on the modern locos owned and operated by DC Railfreight can be seen above. These units have two large lights comprised of LEDs, and have a bi-colour centre light showing white or red depending on their mode. These have been tooled with all of the visible detail of the prototype casing including the centre lights with moulded detail of the LEDs themselves, giving an authentic LED effect on the model. The lighting configuration in the model is bi-coloured to allow prototypical operation of these lights.
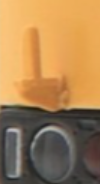
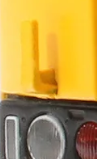
Air intake vent/Lamp bracket/cab side windows - 60001 vs 60027
Returning to 60001, another detail variation is that we have tooled is the absence of the air intake vent on the front second man’s side, beside the headlight unit. 60001 didn’t have this on delivery (as it was a later modification to the locomotive) - we have replicated this by omitting it on our model (see comparison with 60027 and the prototype picture of 60010).

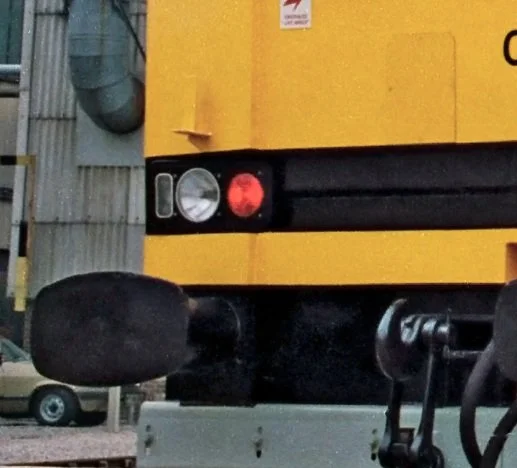
Photo Craig Simmons

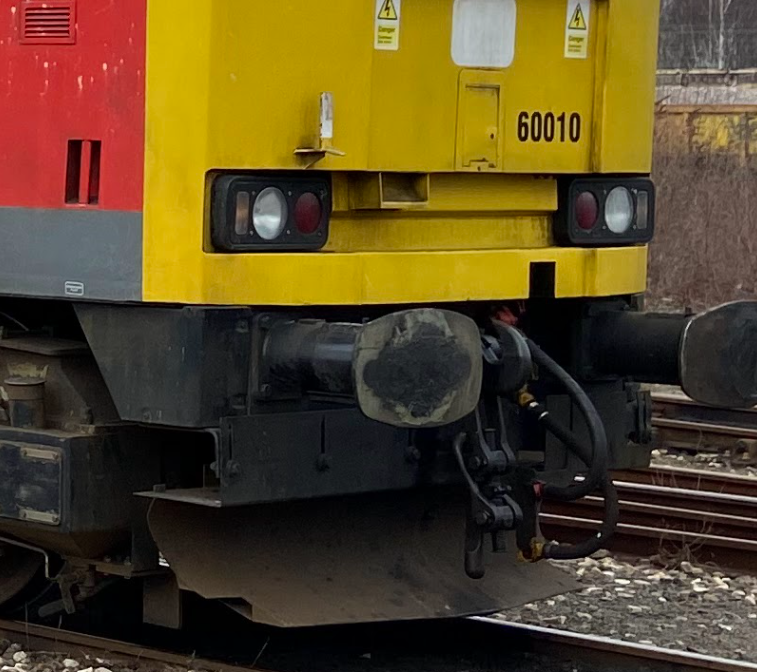
Another interesting detail in this area is the lamp iron fitted over the second mans headlight; the first 11 locomotives have a 3-piece fabricated lamp iron. From 60012 onwards the lamp iron was just a two piece fabrication, with a more curved profile. We have tooled both of these versions, and all of our locos have the correct lamp irons for the number modelled (for example 60010 in DB red is fitted with the earlier style lamp bracket).
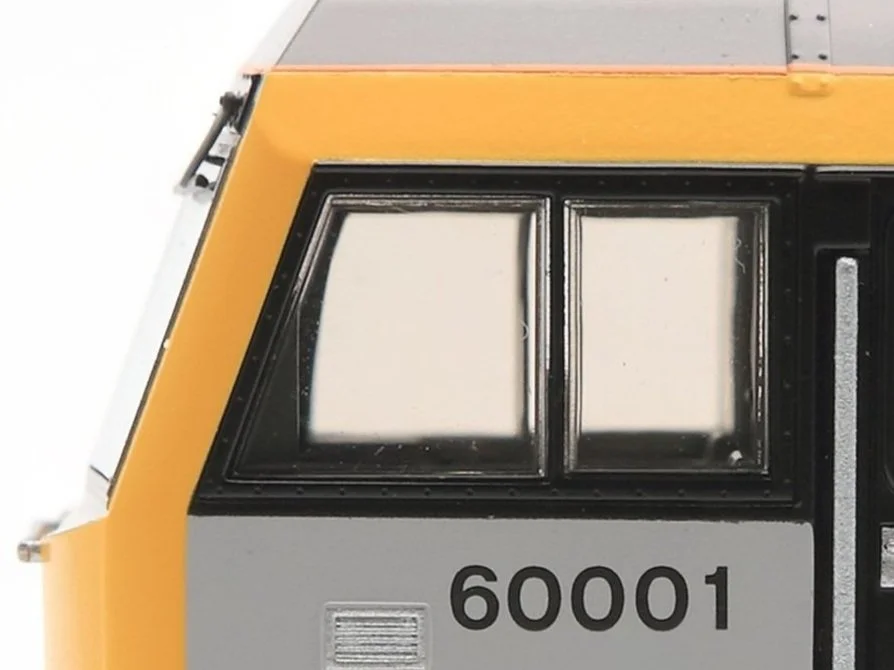
Cab windows & cab internal frame structure
Moving to the cab windows, the locomotives when launched had a two-pane drivers window, which we have added into our body tooling suite, allowing the Cavalex Class 60 to be modelled in the early service period, 60001 naturally having had this configuration when new. The side windows on all Class 60s, including the replacement three pane versions, are tinted in contrast to the front windscreens. This difference between the glazing on the front and side windows, is such an obvious feature of the real locomotives, that we had to replicate this feature on our model!
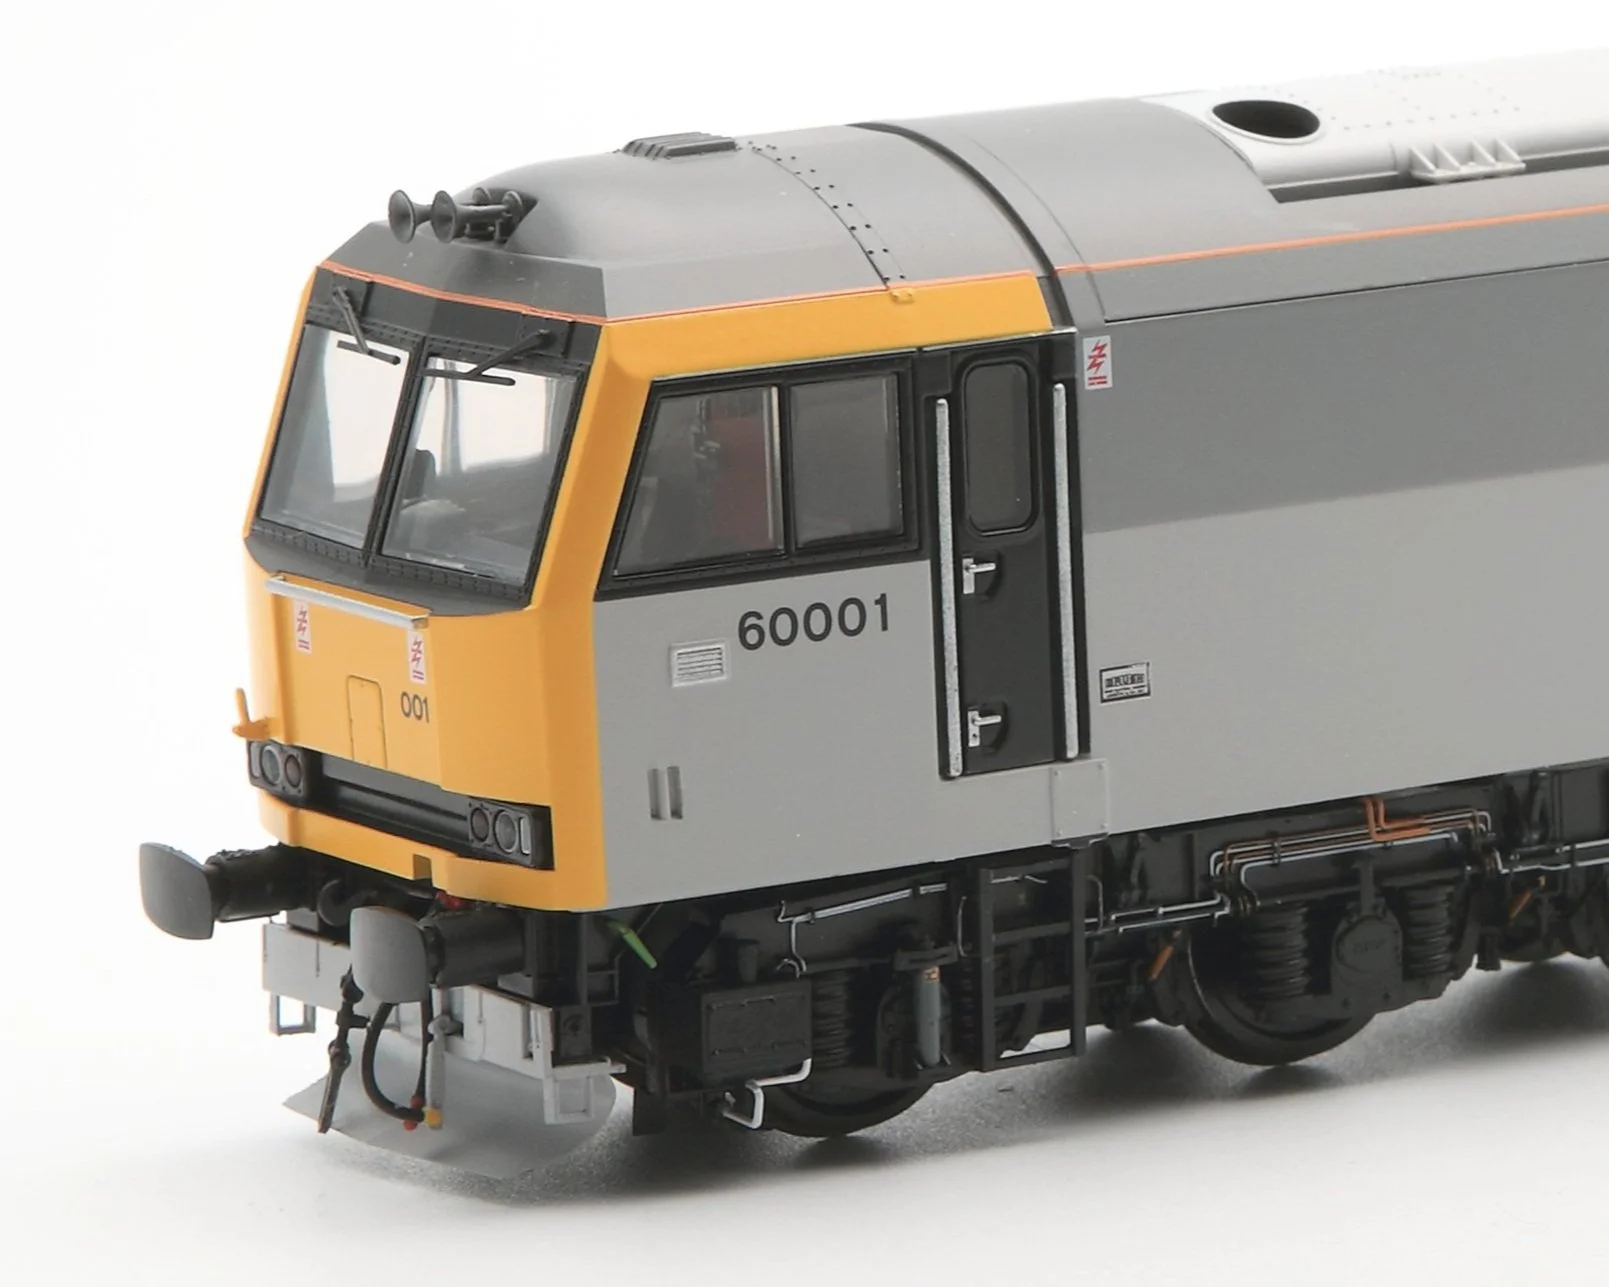

Photo Craig Simmons

To enhance the window frames further, the obvious choice for us was to tool up the screw heads that hold the frames to the body of the loco. Although almost flush with the frame, in reality they are often recessed in slightly due to their countersunk nature, which collects dirt very rapidly in use - a very obvious and distinctive feature of the face of the locomotive. The decision to subtly mould these into the frames, allows the detail to endure any weathering that may be done by the customer and allow for further modelling, like picking the frames out in silver or full locomotive repaints without losing the detail. As our models are aimed at bringing high fidelity to all levels of the hobby we cannot exclude those that want to paint and weather our locos to enhance them further; in fact we encourage it!

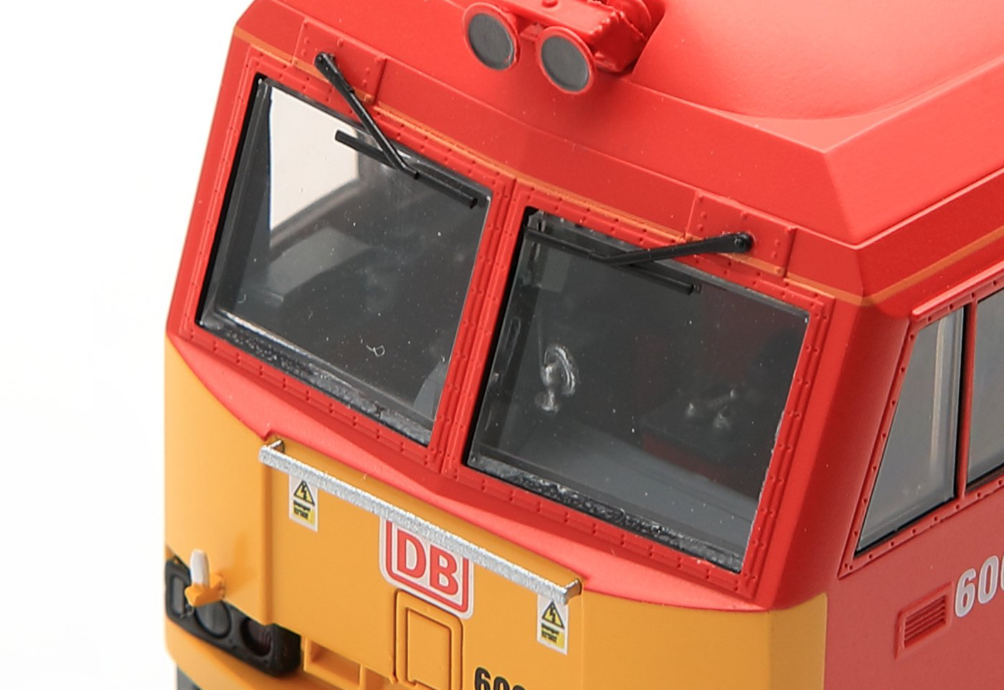
Whilst looking at the windows you will notice that it is very easy to see the body frame structure through the cab side windows, manifesting as a triangular structure in the front corner of the quarterlight. We have tooled the cab frame as a part of the driver’s cab, in order for this important detail to show through the window just like the real thing - a distinctive detail not seen on any other model of the Class so far.
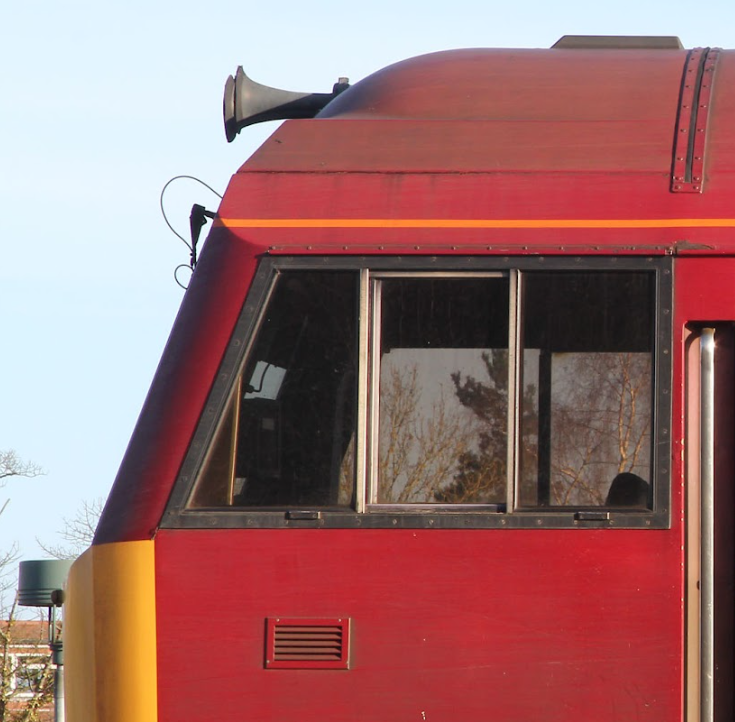
Photo Brian Daniels
Cab interiors
Within our Class 60, we have created one of the most accurately reproduced cab interiors seen to date with colours, signage, decoration and tooling to reflect each individual locomotive modelled, complete with structural framing as seen above. An example of the modern cab can be seen below at the bottom, with the original cabs shown on the top - fitted with basic air conditioning and a window pillar telephone.


Photo Brian Daniels
Later after refurbishment, the air conditioning units were changed and Qtron boxes fitted to the pillar instead (these details are fitted to the Cavalex Class 60 on the inside of the glazing). As the new air conditioners were not performing as required, it was decided to fit electric fans to the desk - these are moulded as part of our later cab detail as seen through the large cab windows of the prototype. The dim dials are represented with phenomenally fine printing from the factory, each design traced off of 60010 during our launch video with Hornby Magazine.
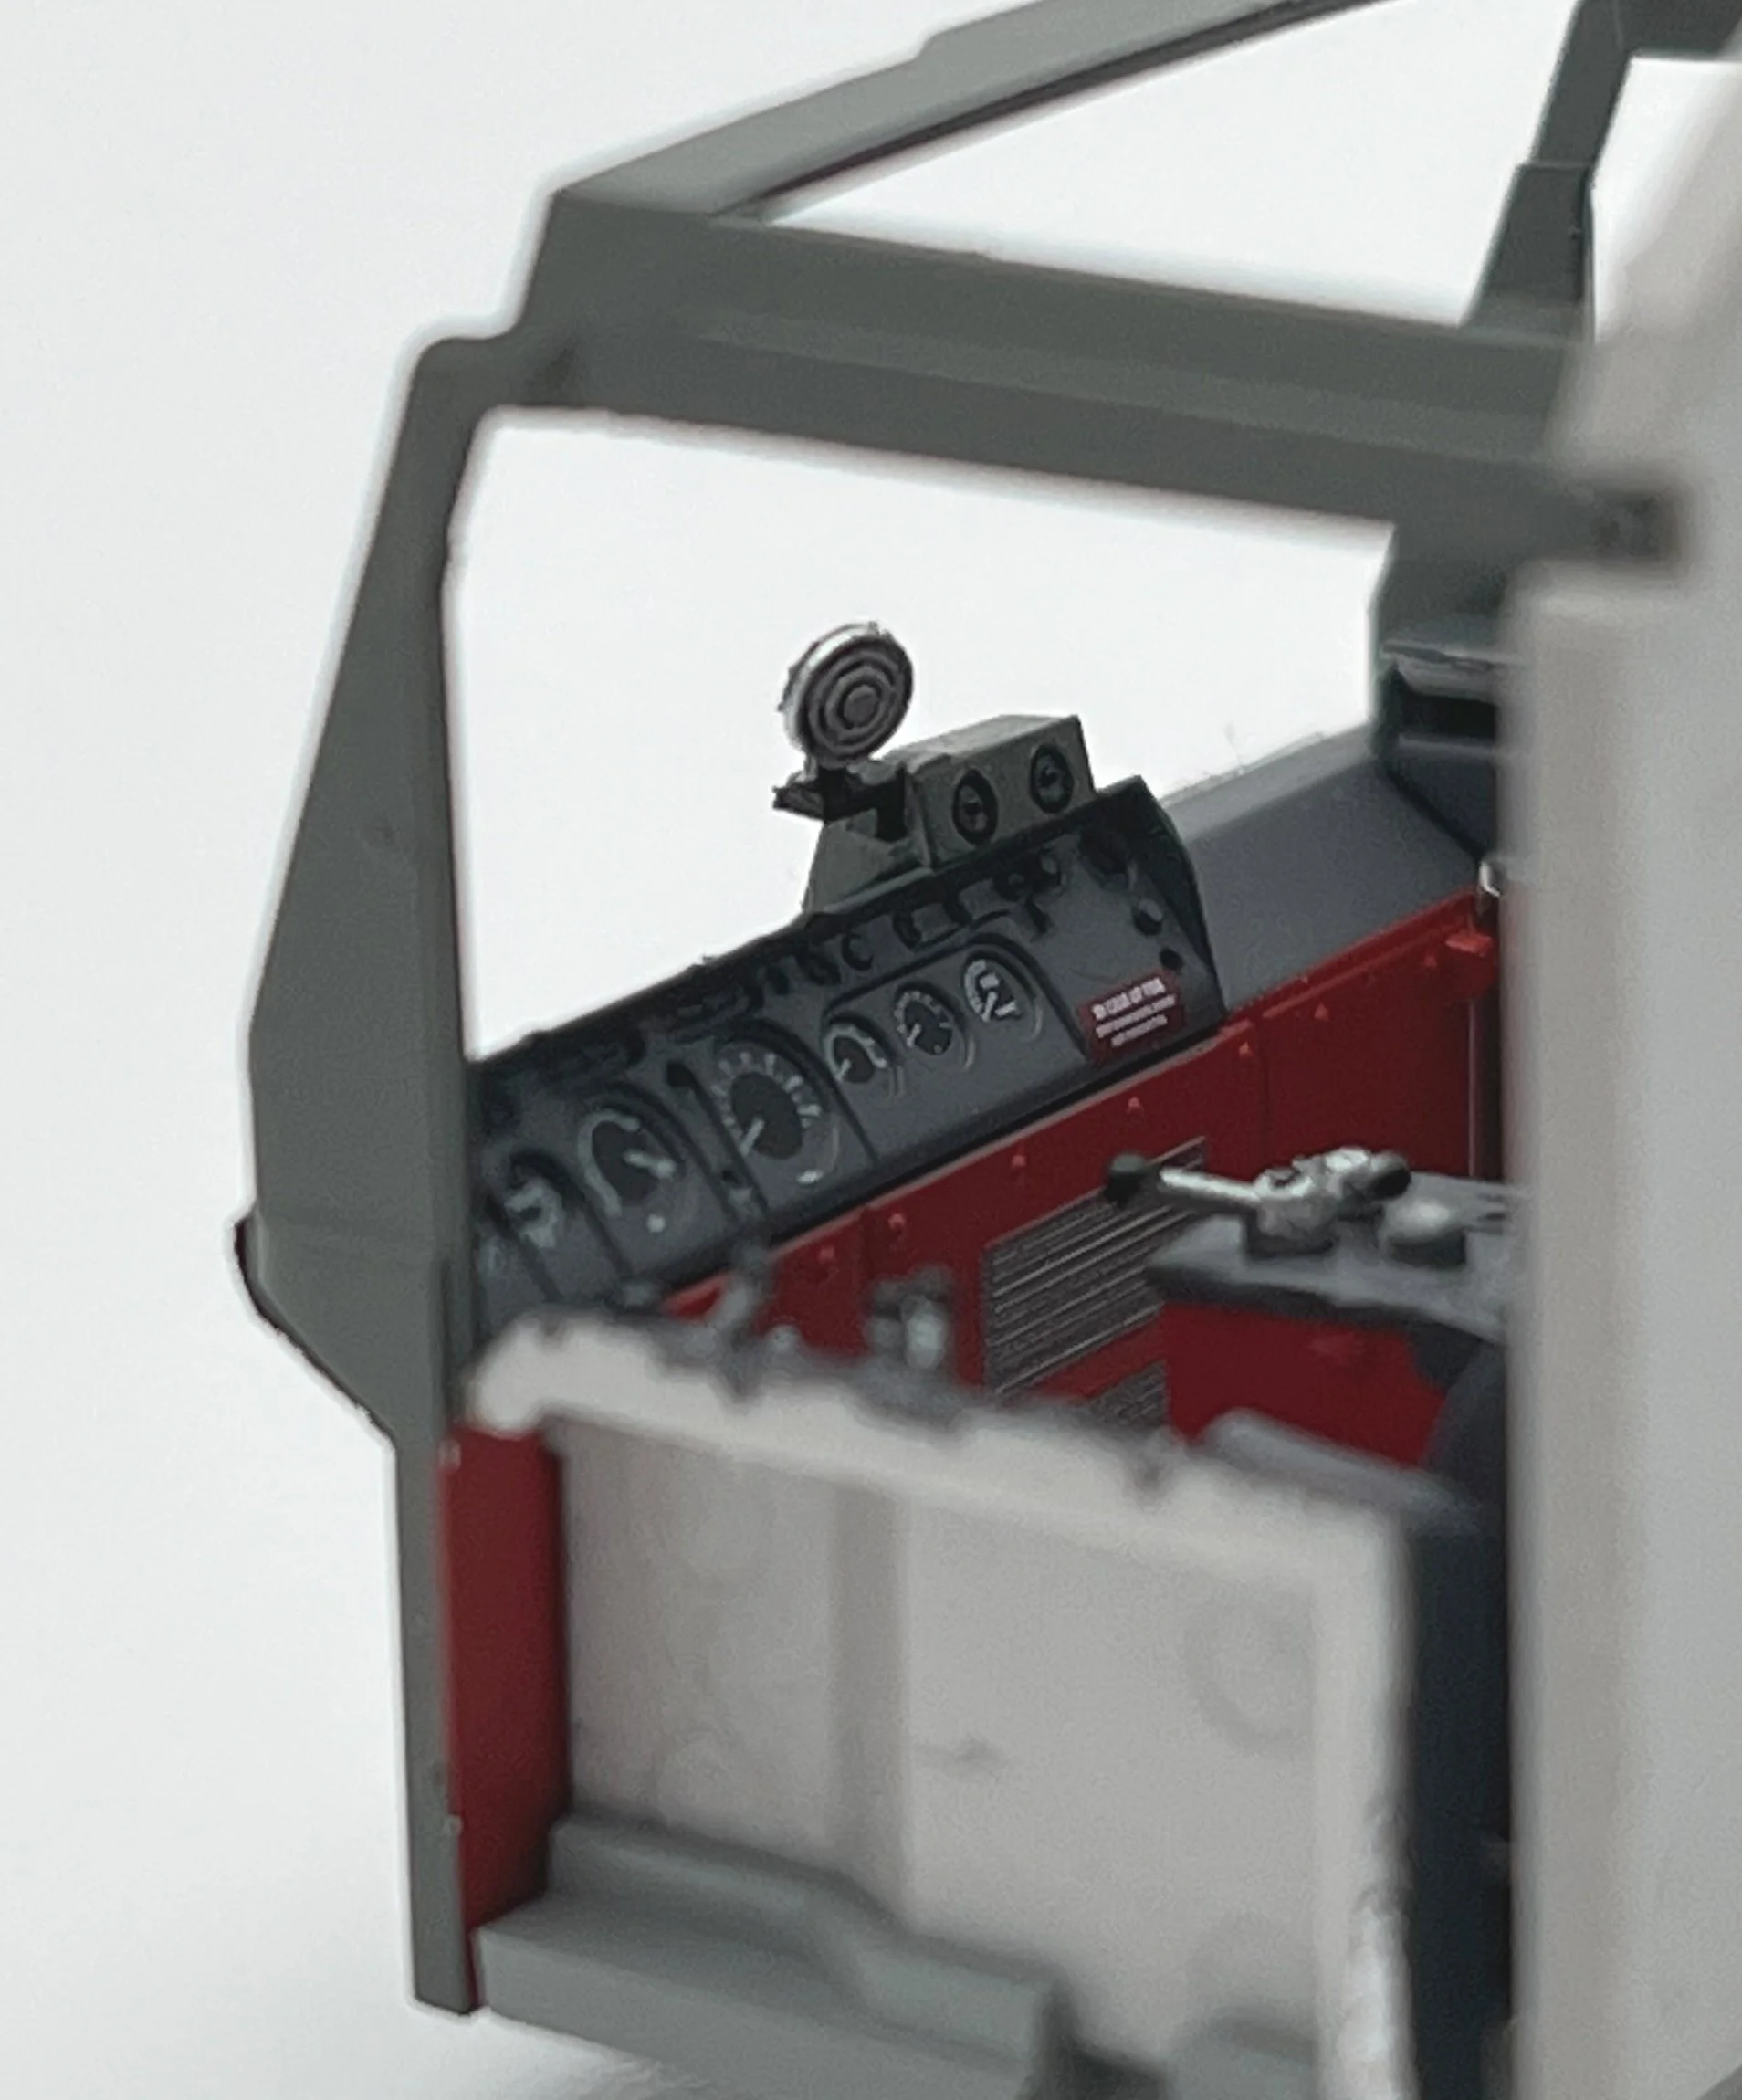
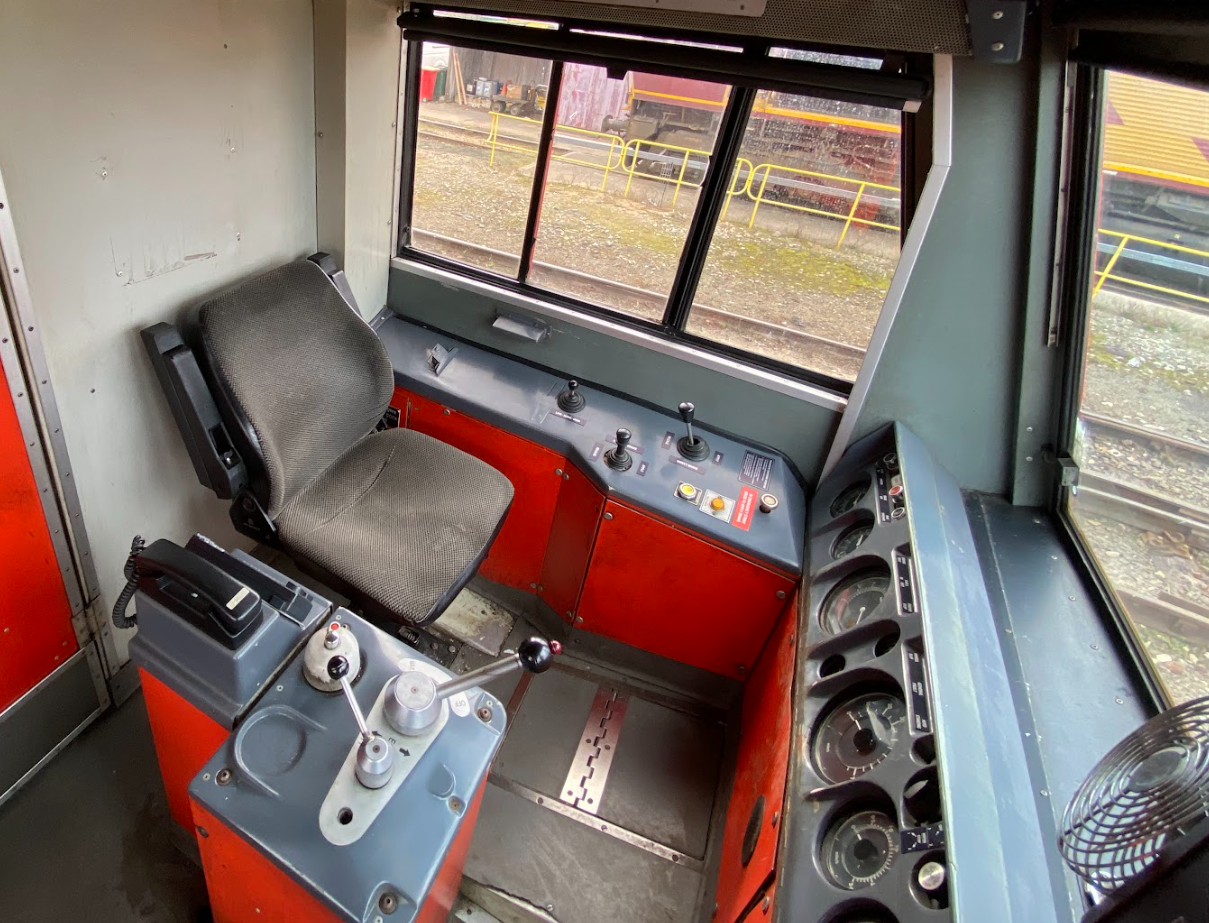
Photo Brian Daniels
Bufferbeam & Snowplough variations
Moving down the cab front, another unique piece of tooling for 60001 is the original design, full metal snow plough with bolted on side stirrup steps. This design was outshopped in Rail Grey and looked very smart when delivered, however when testing the locomotive on the southern region the plough unfortunately hit the third rail causing a short circuit and damage to the plough. These were therefore removed for a short period before the plough was redesigned, with notches that would clear the third rail and negate further issues. We have tooled this unique plough for our model of 60001, in addition to the standard black version with corner notches for the rest of the fleet.
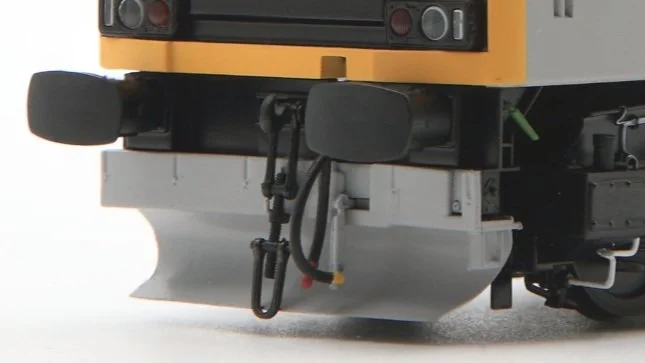
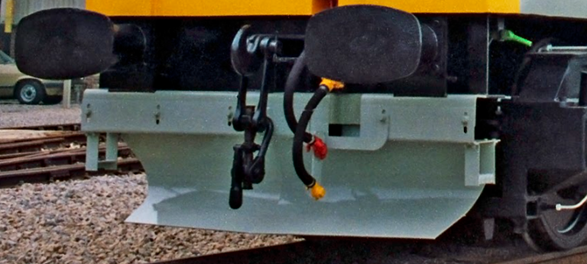
Photo Craig Simmons
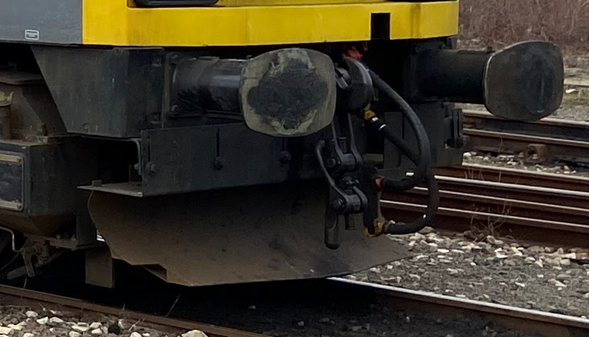
This is a good time to talk about 60028 in the striking Cappagh blue livery, which we noticed had a replacement snowplough fitted at the No 1 end. The alternate snowplough didn’t have the notches in the corners like the standard Class 60 snowplough, but was not the same as the original snowplough fitted to 001. Again for accuracy and following our ethos of delivering the most accurate and detailed models possible; we have tooled that loco specific variation as well, with the Cavalex model of the locomotive having two differing snow ploughs at each end as per the real thing.

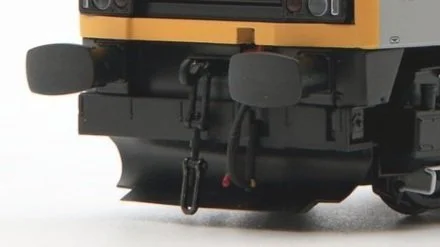
This leads us nicely to the buffer beam detail itself; it is all factory pre-fitted to a magnetically removable bufferbeam that allows for instant switching between fully detailed use, as well as the NEM pocket coupler. The magnets holding our innovative first in the market example of the magnetic bufferbeam, are plenty strong enough to haul prototypical trains using the screw link coupler supplied, if so desired.
The details fitted to the buffer beams are prototypically moulded, with the coupling hook pivoting like the real thing, and the screw thread itself being moulded into the chain for full detail authenticity. We have also modelled the two differing rears of the buffers depicting early and later styles.


When the Class 60 was first delivered, the bufferbeam was not fitted with the side cowls, exposing the chassis framework and drainage pipe below the cab. In order to authentically model 60001 ,we have tooled a completely different buffer beam from the standard production version that, instead of the usual cowling, has the framing moulded and separately fitted drain pipes fitted to replicate 60001 as delivered.


Photo Andrew Walker
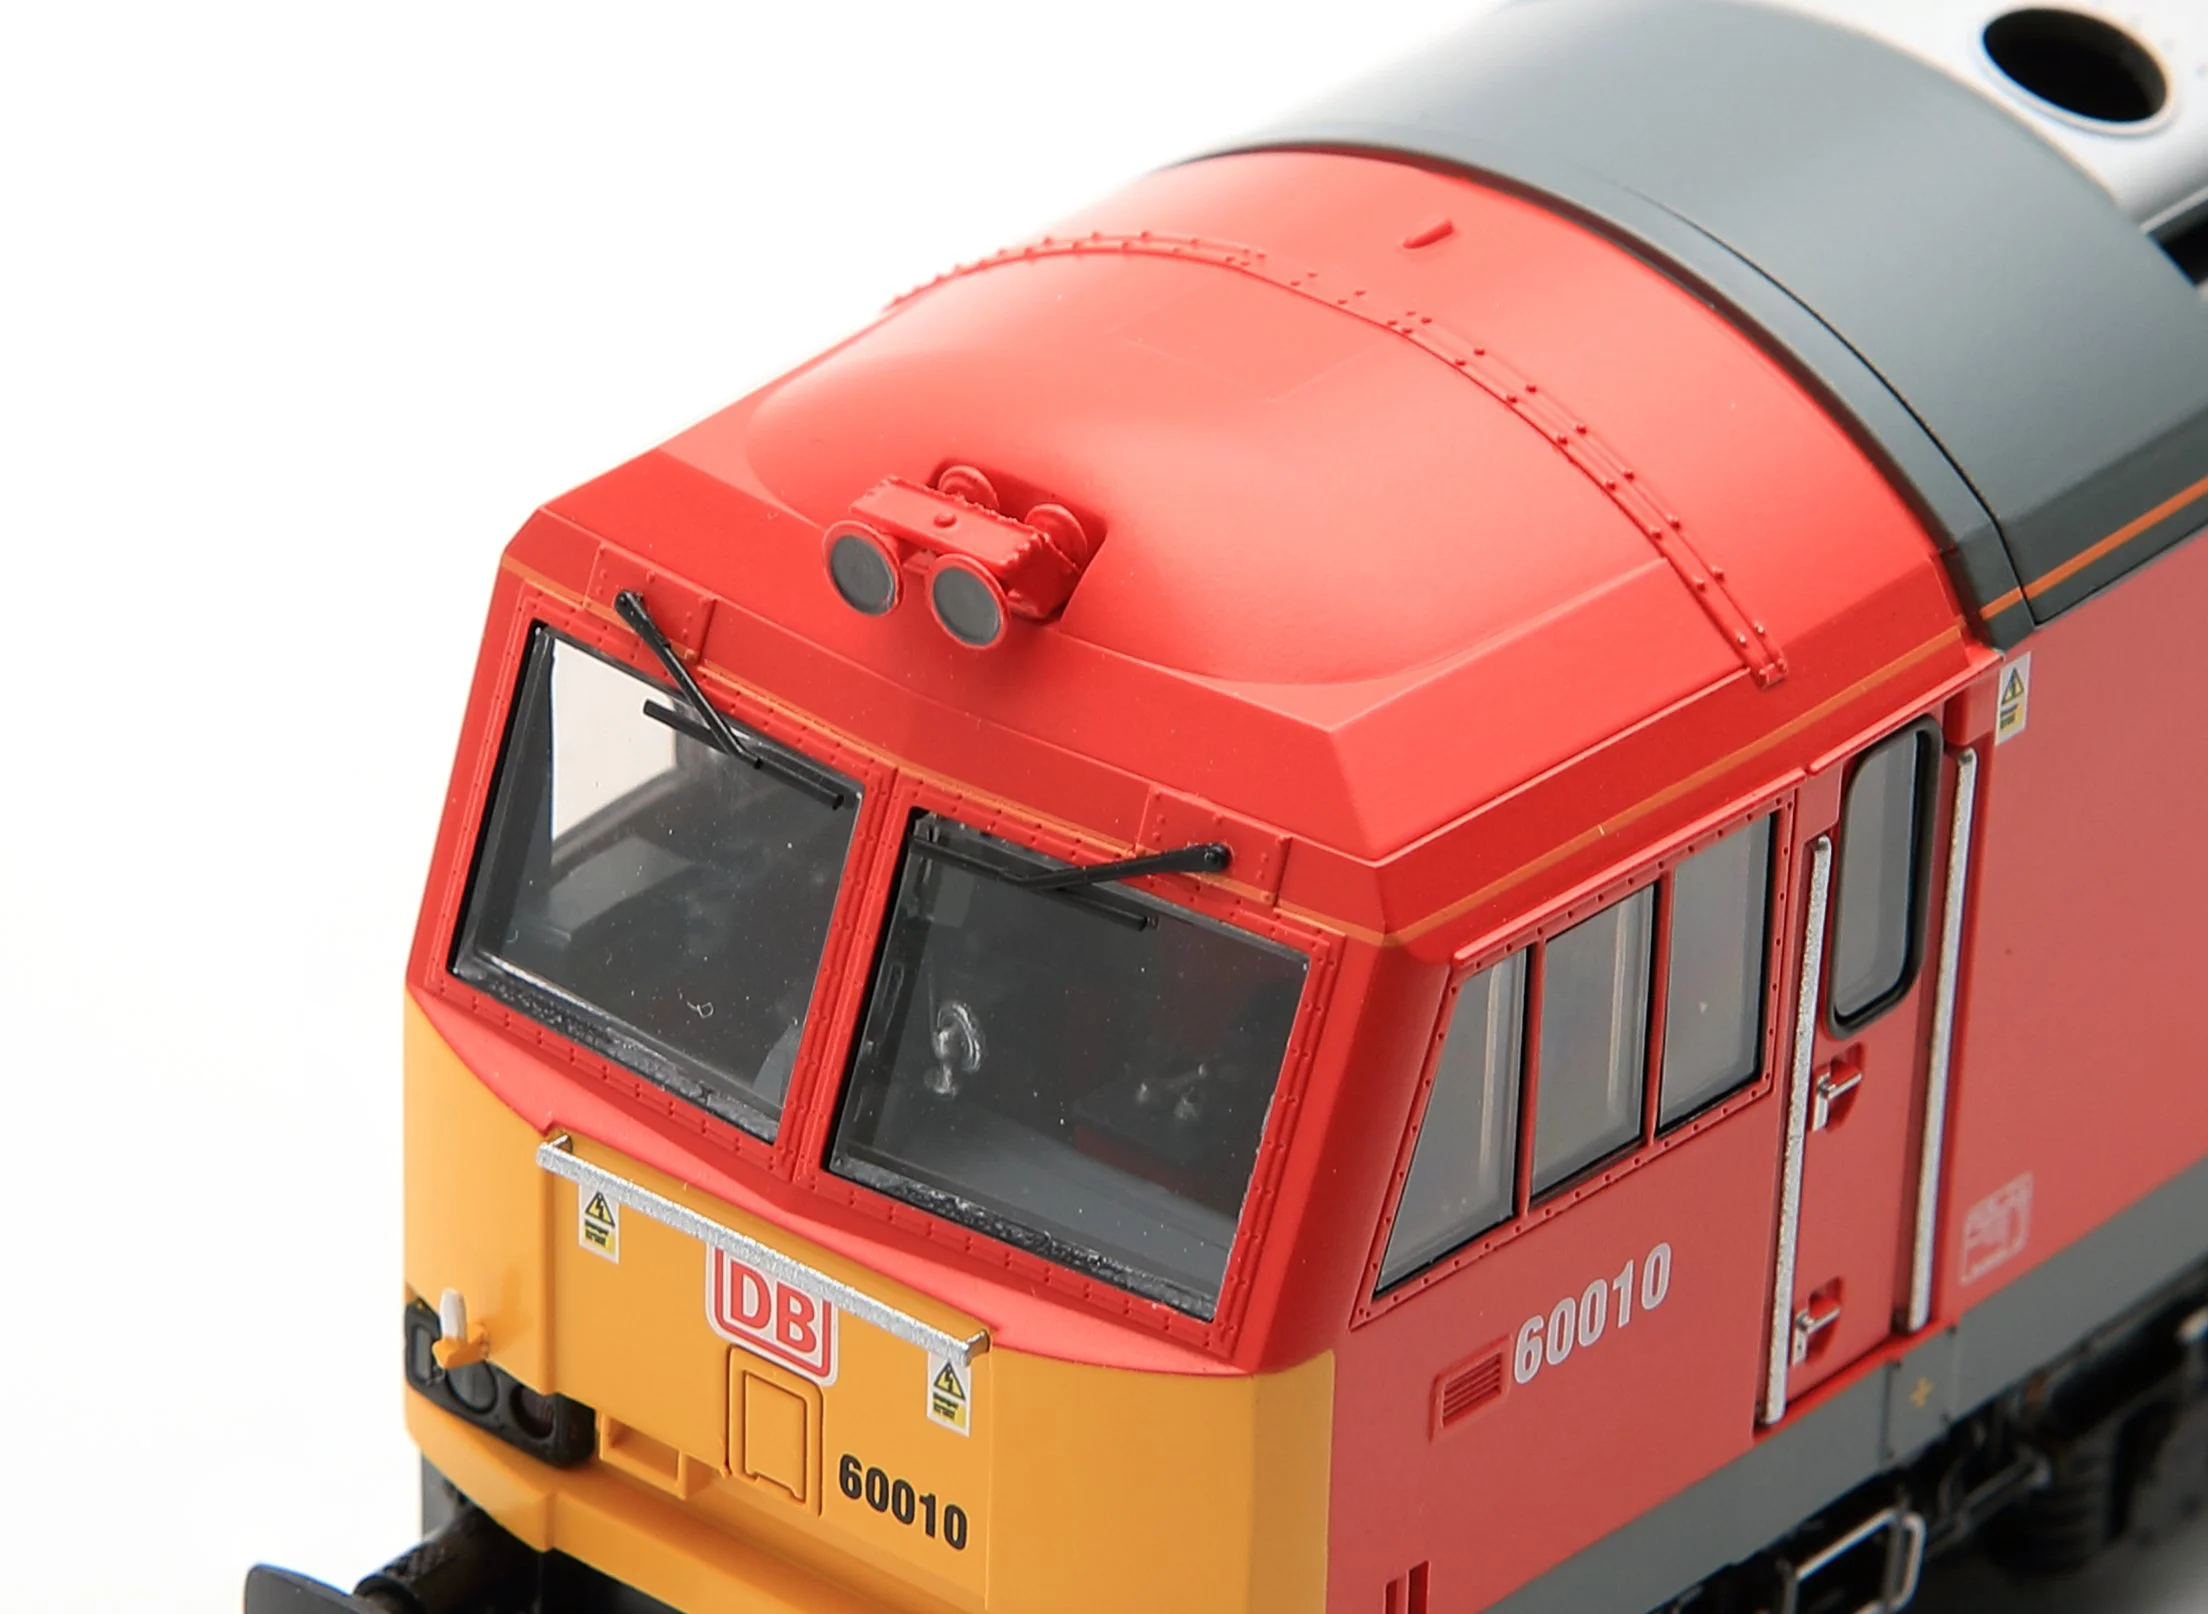
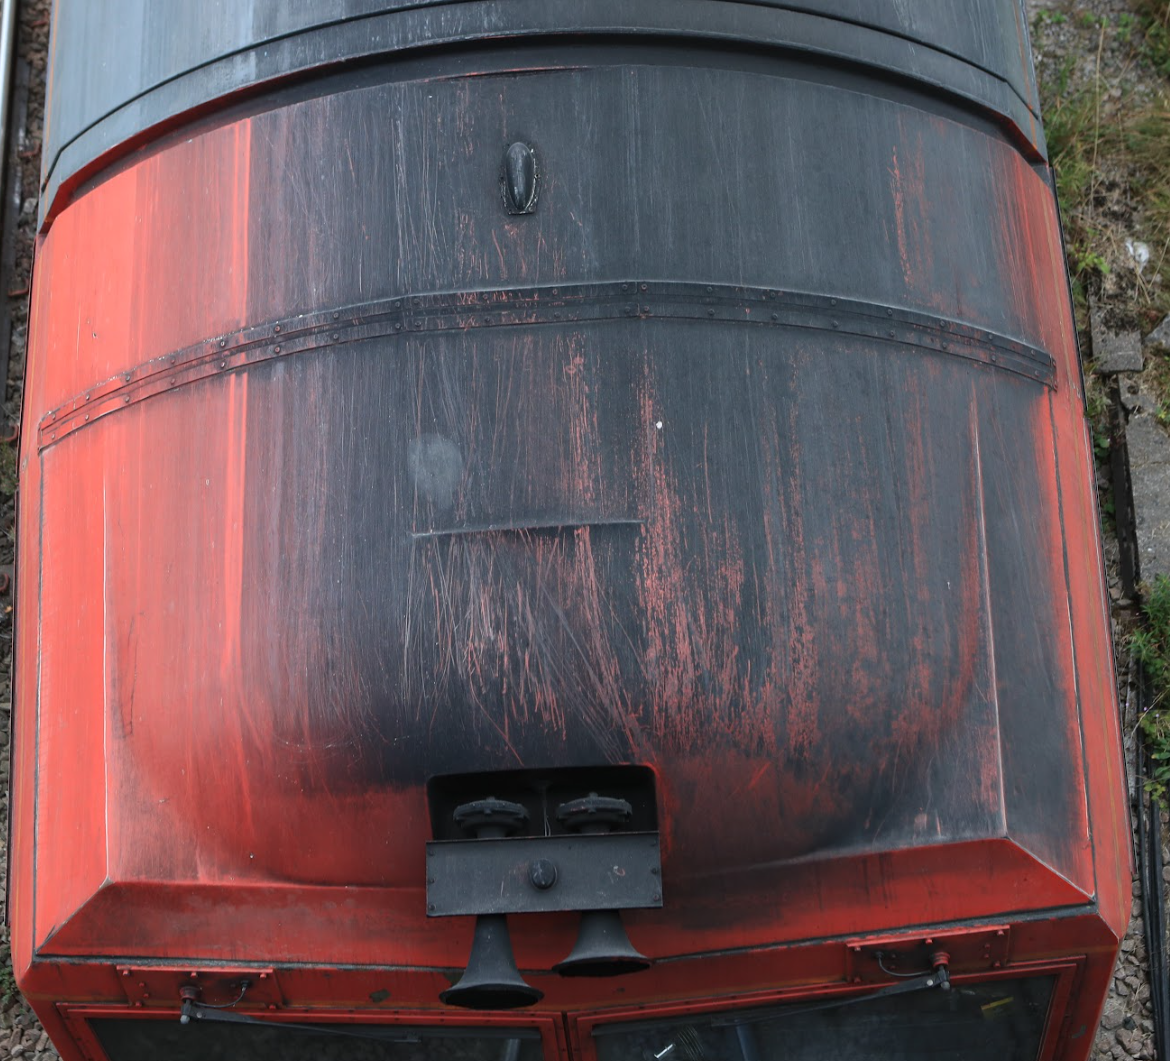
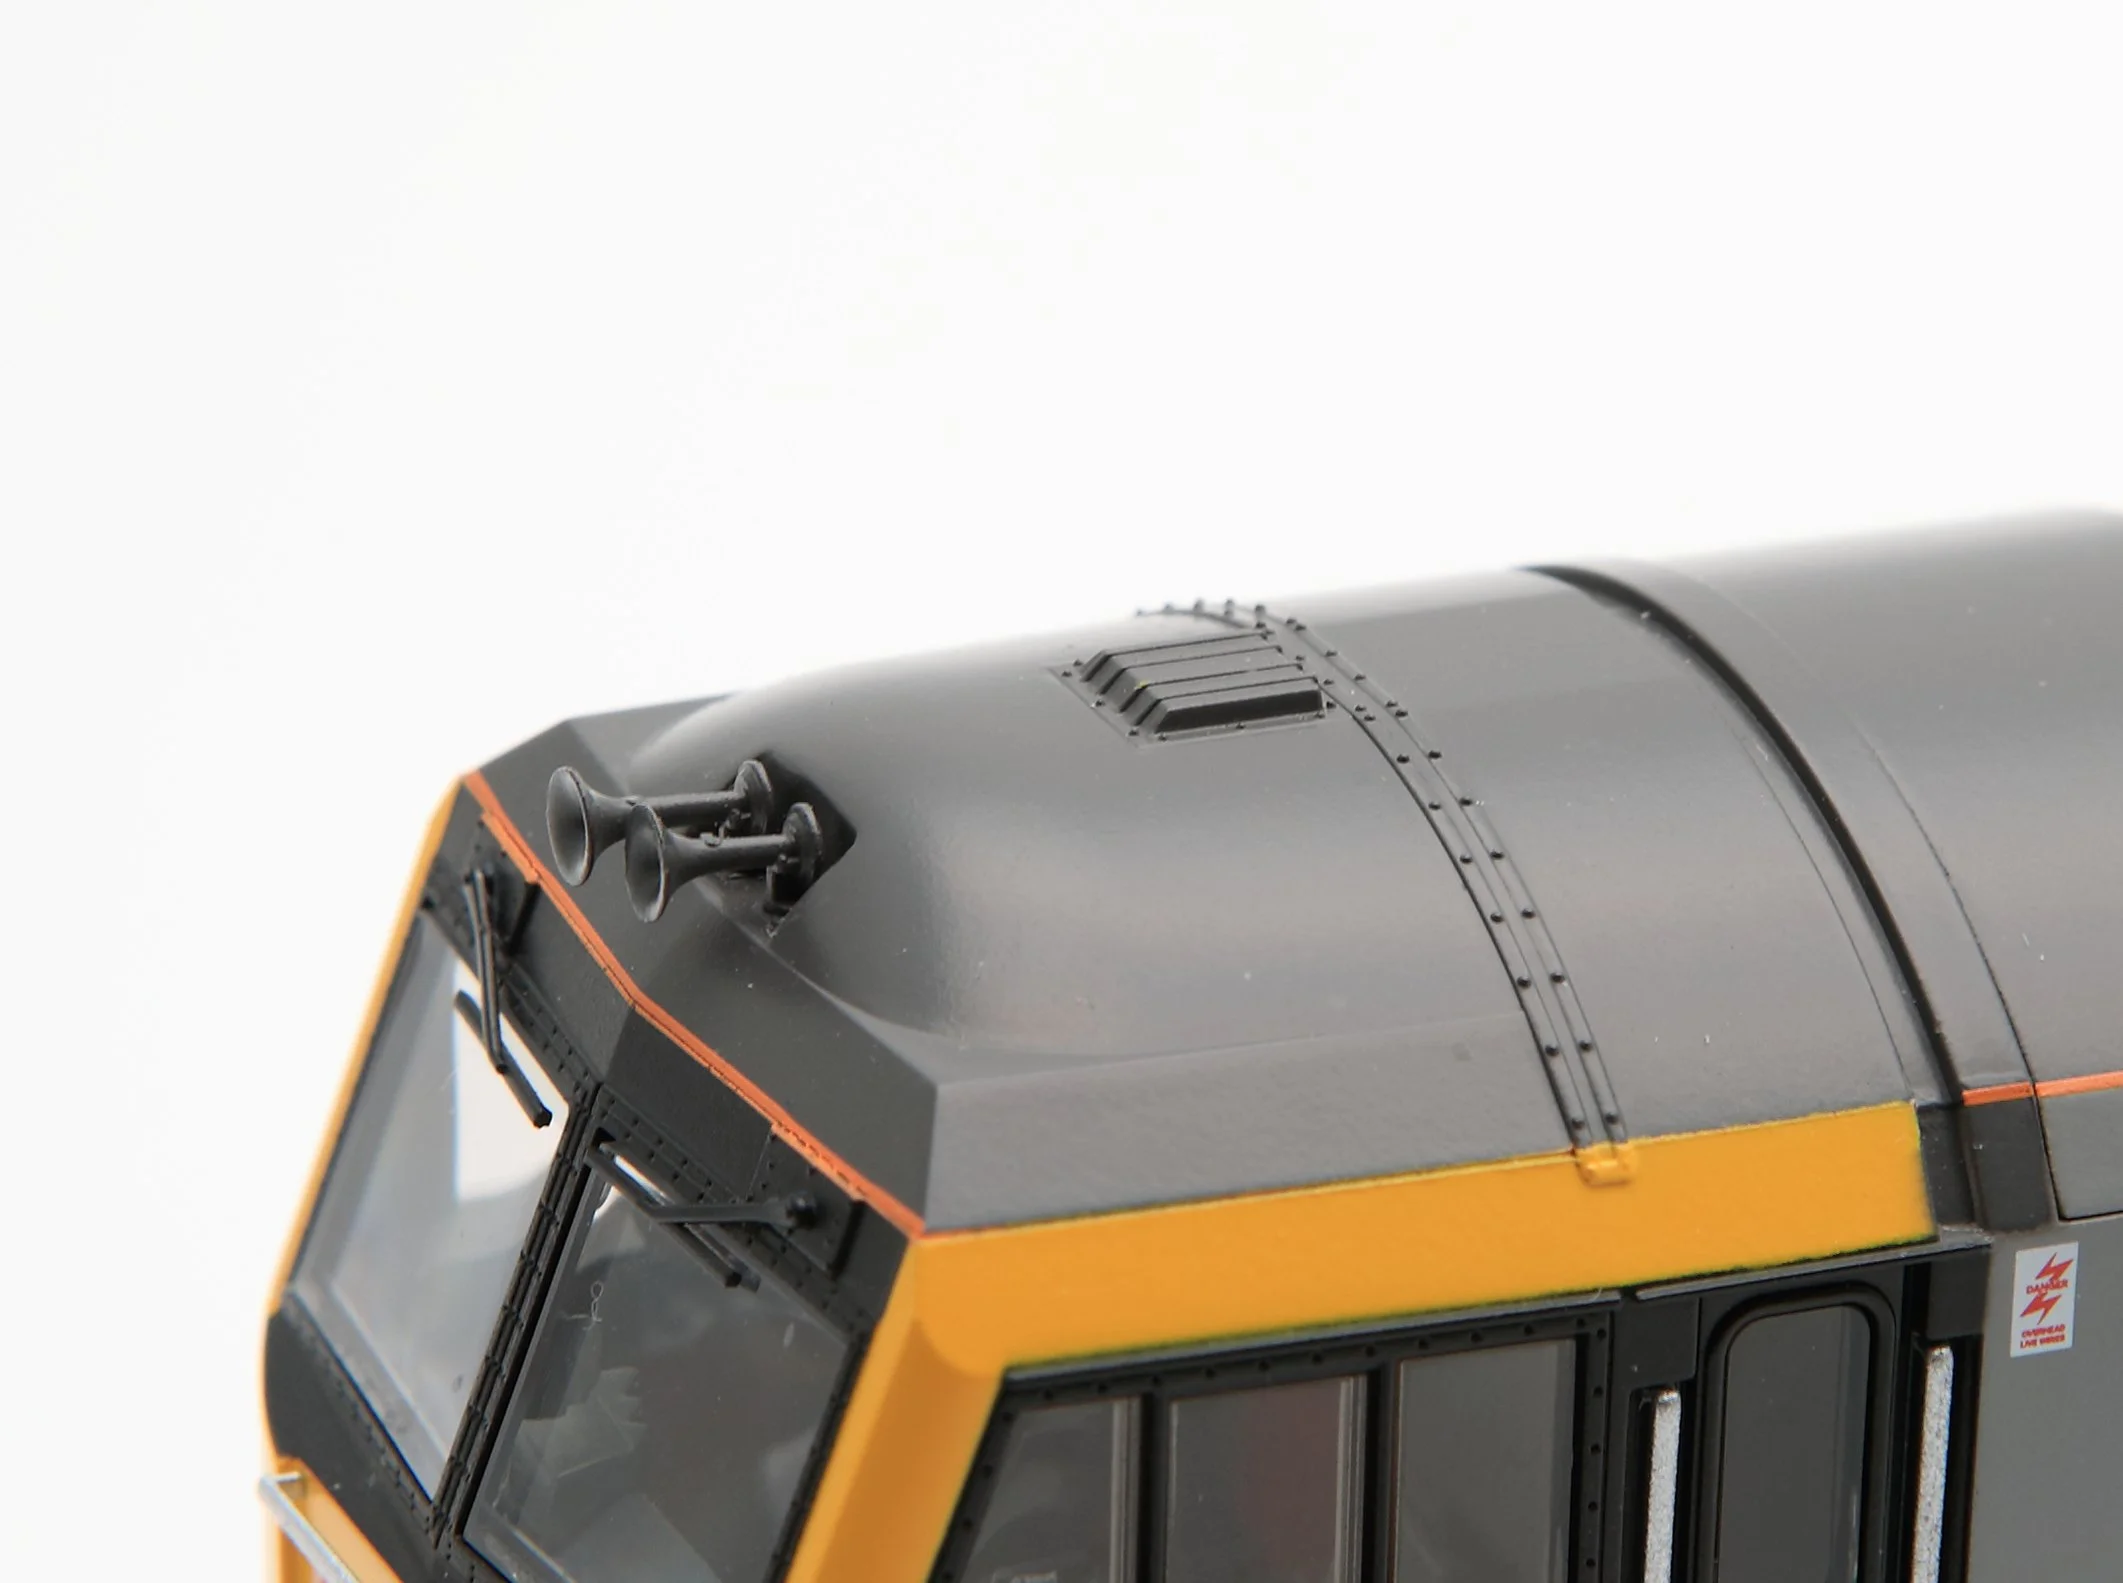
Wipers & Horns
Now to concentrate on the top of the cab of the loco; the wipers and horns. The Class 60, like all locomotives, have windscreen wipers that are bolted to the end of drive shafts, with an arm that tapers down to the blade holder. To ensure the detail is captured correctly; this has to be moulded to be the correct shape. Whilst we have had to sacrifice a minimal amount of scale thickness, we believe this is well worth it to achieve an authentic shape including bolt detail and the tapered arm - a good balance between the prototype and modelling constraints! We are constantly working with our factories to improve how finely we can consistently mould plastic, and we making improvements to all of our models as technology catches up with our vision.
The horns themselves consist of two sets of tooling; one representing the locomotives as seen up until the late 1990s and the other representing the locomotives later on after snow shields were added to the horns.
Originally the horns were open as shown below, this is how our early class 60’s are modelled.

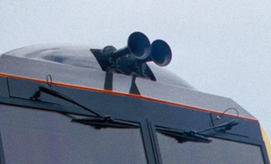
Photo Craig Simons
Snow shields were added as a later modification to the class, to prevent snow build up inside the horn. This is how the majority of Class 60’s horns have looked since the late 1990’s.


Photo Brian Daniels
On later locomotives the horns at the No 2 end were also home to the GPS bracket. This of course has been tooled for the appropriate locomotives, but omitted for the ones that don’t have the bracket fitted (either pre the fitment of the bracket, or with the bracket having been removed later due updated communications systems no longer requiring this part).
NRN pods
From new the Class 60 was fitted with NRN pods on top of the cab roof. The locomotives remained like this in service for many years before the later GMSR system rendered the pods obsolete. Some modern locomotives have the NRN pods removed, although not all, and we have ensured that any loco that has the GMSR fin is researched to assess whether it has had its NRN pod removed, adjusting the tooling for the individual locomotive modelled. The model therefore may or may not have the NRN pod, depending on the prototype modelled, a cautionary note for modellers wishing to renumber their loco as it is easy to overlook this small detail! The loco below has the NRN removed and GMSR fin fitted, just like our 60010.
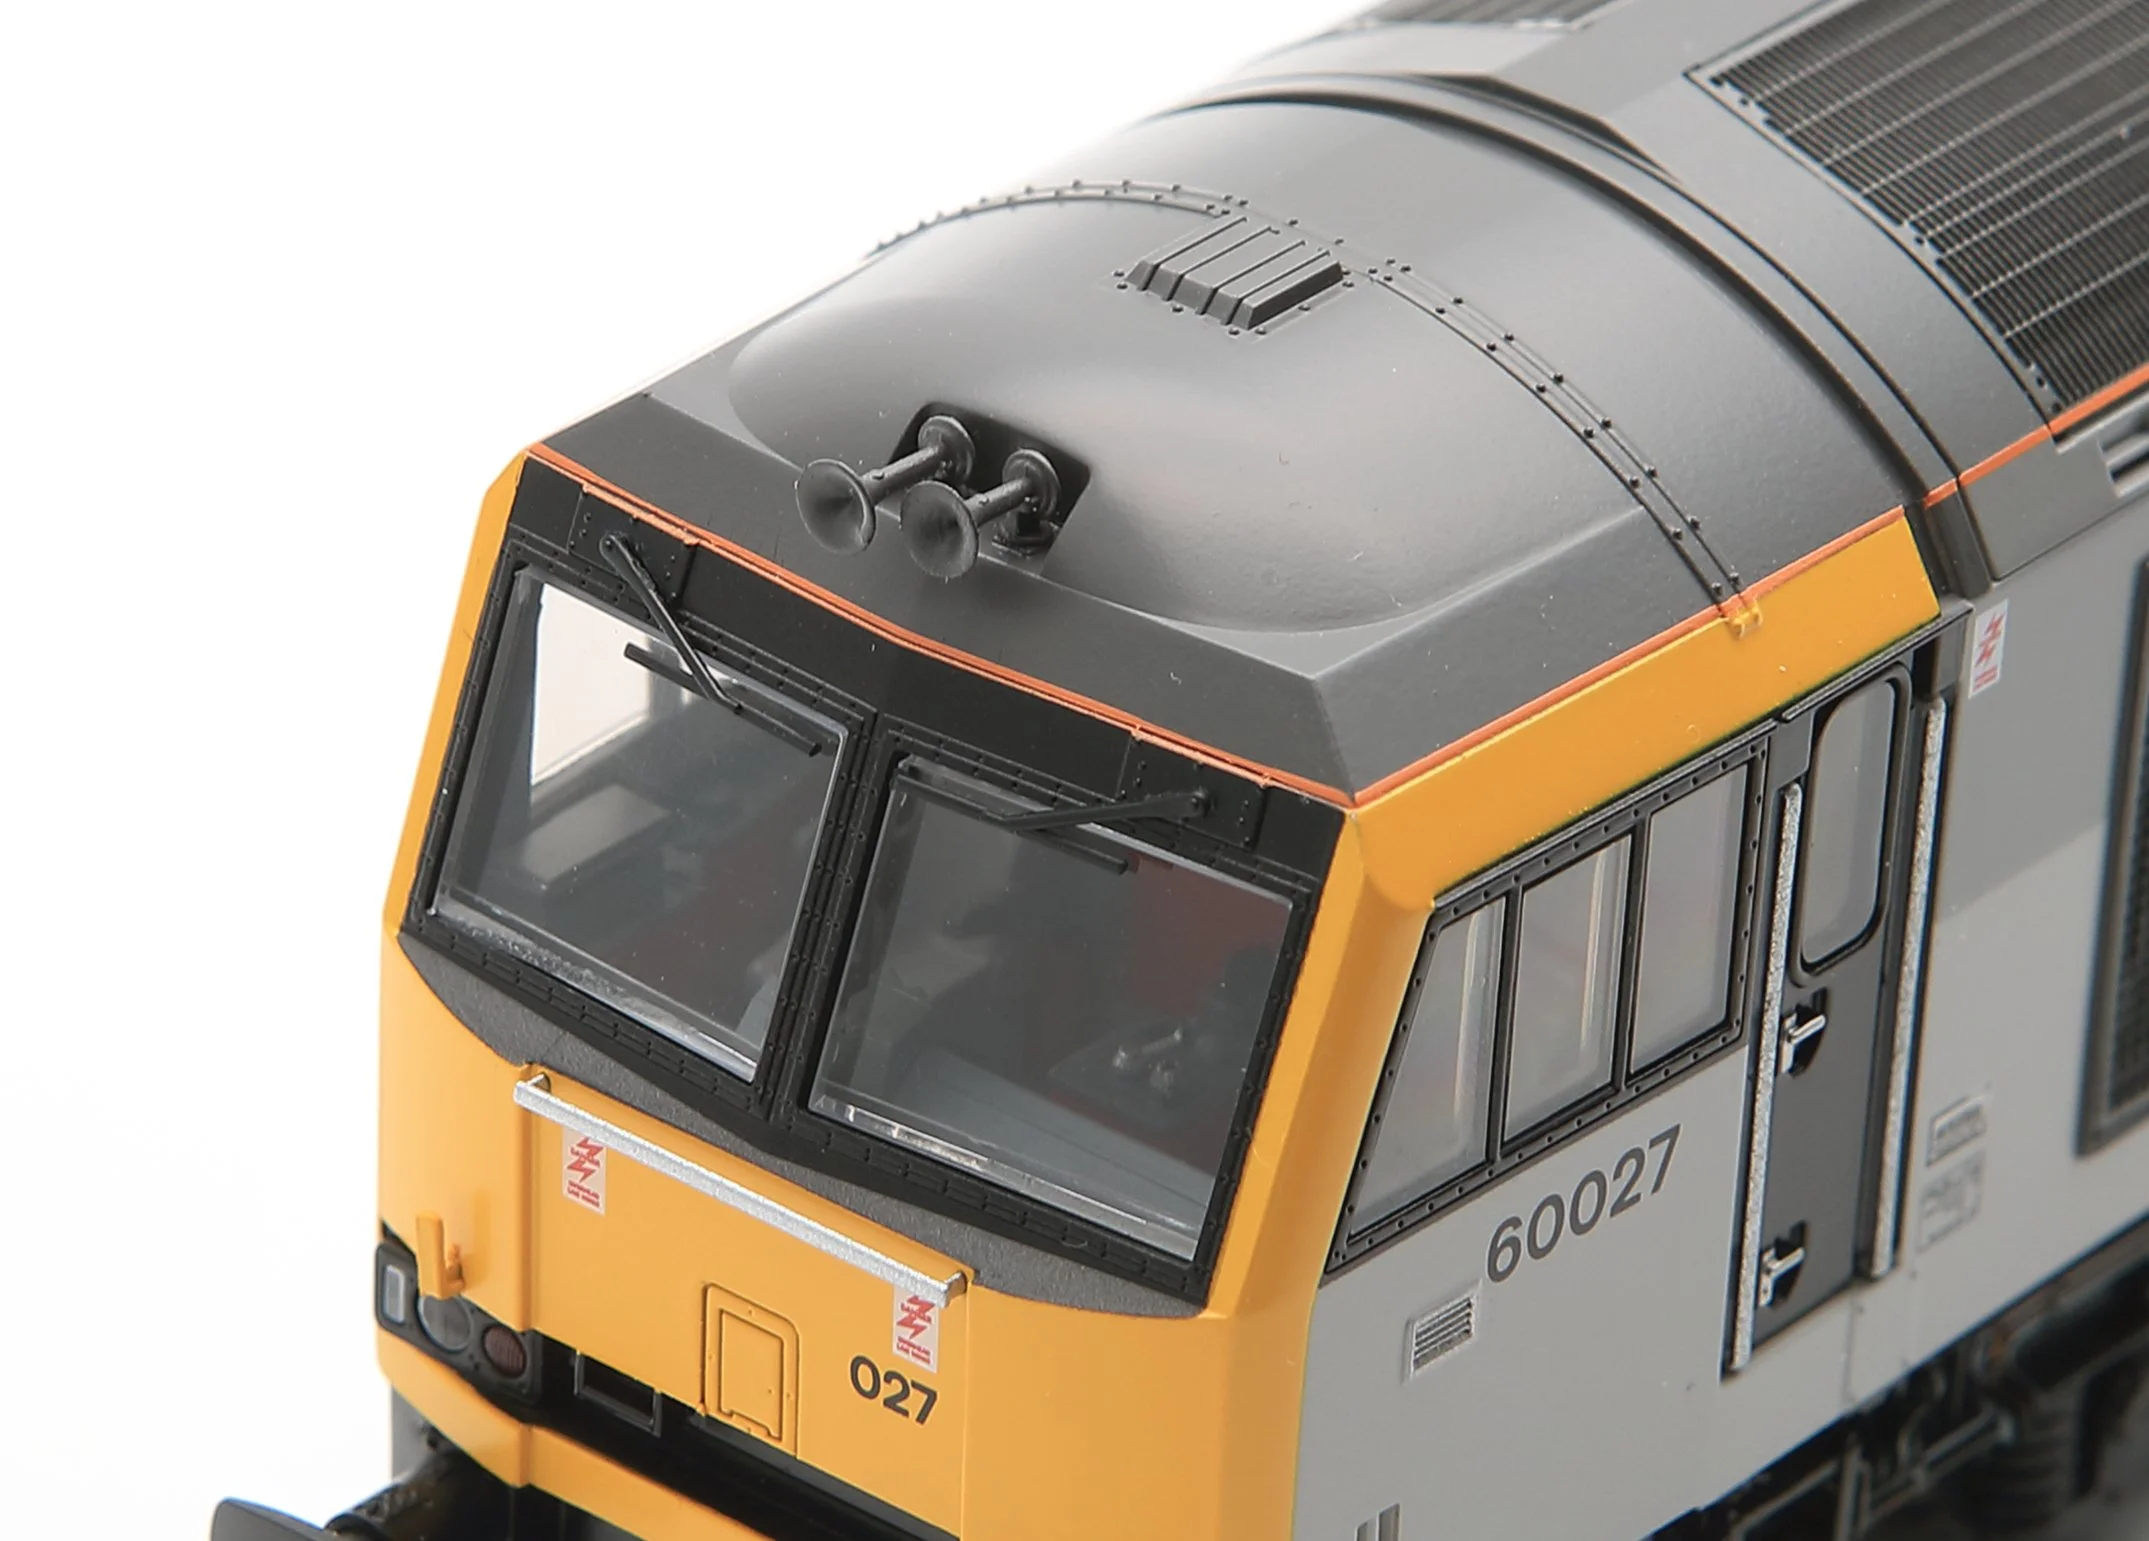

Photo Brian Daniels

As we move back along the locomotive’s roof, we see the joint strap bolted across the top. Originally this was a one piece strip and this has been tooled as such for our 60001, yet another variation for that loco! This was quickly revised to a double strip with sealant, which is how it can be seen on all other ‘production’ locomotives. We of course have tooled this variation as well:

Body tooling
Moving down the side of the cab we reach the vestibule and cab door. With a prototype as open as the Class 60 in the cooler group area at the No 1 end, there is limited space for the bogie drive tower of the model without compromising the look of the model. As a consequence of this, the drive tower has to reside in the vestibule and cut through the engine room bulkhead. It is an important philosophy of ours that ‘model’ parts should not be visible during the running of our locos and that includes drive mechanisms and circuit boards.
Items not present on the real thing should not be visible and detract from the look of the model, which is why we looked at the vestibule. Our original intent was to have the vestibule see through like the real loco, however that meant that in order to make a clear path for light to pass across it, model parts would have to be visible in there which we were not prepared to have. Secondly, as the drive tower cuts through the bulkhead, that meant that it was possible to see into the engine room through the vestibule window at the cooler group end, and for light to bleed back into it from the engine room, which of course is not the case on the prototype. It was then that we made the decision, based on our philosophy that in order to hide the ‘model’ parts, to create an internal bulkhead either side of the gear tower, both hiding the tower through the windows and blocking light leak from the engine bay. We coloured the central bulkhead black to hide it from view and side walls grey as per the prototype. The windows were clear and can be seen through, allowing a view of the side walls as per the real thing.
This is even more important with night running and cab lights/engine room illumination as any light in the vestibule will only highlight the models gear towers and circuitry even more, we feel that this is the best compromise to a difficult situation. We believe it is more important to hide the model parts and not see right through the vestibule, than have them open and show the functional internals of the model.

Photo Brian Daniels

As we move down to the bottom of the cab we reach one of our favourite details; the door keyhole. Not content with a smooth handle plate we added the keyhole so that our 1:76.2 scale driver can unlock his loco for his morning shift. It may not be ground breaking but it is another example of how the Cavalex Model’s ethos dictates our details.

Photo Craig Simmons
Further down we reach the bottom edge of the cab and there is a small 10mm lip along the bottom. This has been tooled on our model as well.
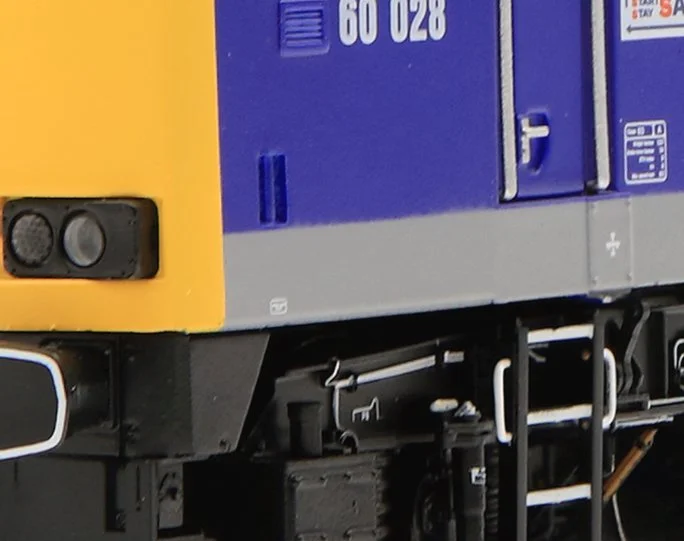
Additional bodyside tooling includes the small jack point pad, slightly reduced in height to minimise risk of bogie contact aiding running in model form.
Moving back from the cab we have the cooler group area. This is an important detail and one where we have gone to extreme lengths to get correct. All of the internal machinery has been researched measured and recreated in model form from several separately moulded and assembled parts. The second man’s side also includes the distinctive blue water pipe running across the bottom of the grill, mounted directly behind the grill framing just like the prototype and not as part of the internal structure. The radiator behind this side, also has an etched mesh grill fixed to the face of it for added relief.


Photo Brian Daniels

Photo Brian Daniels

Photo Brian Daniels
The external grills are of a two stage etching process, allowing for the over/under lap nature of the real mesh, with the vertical wires being external and the horizontal ones internal. We are particularly proud of these etches - which look very effective and give an authentic 3D mesh appearance.

Whilst looking at the cooler group we wanted to highlight the tooling differences between the standard Class 60 and the extended range Class 60 - with its relocated air compressor. During refurbishment, some locomotives were fitted with long range tanks underneath the loco between the compressors - meaning that the air reservoir needed a new home inside the cooler group (shown below).

This has been modelled on an individual prototype basis, which again means you need to be careful if renumbering locomotives to ensure the correct equipment is fitted to your chosen locomotive.
When looking at the No 1 end side grilles, you can see right through the locomotive just like the real thing. For dark (or night time operations) we have added correctly positioned engine room lights, located near to the cab bulkhead on each side, illuminating the detail and casting the correct ambience through the side mesh.

Photo Brian Daniels
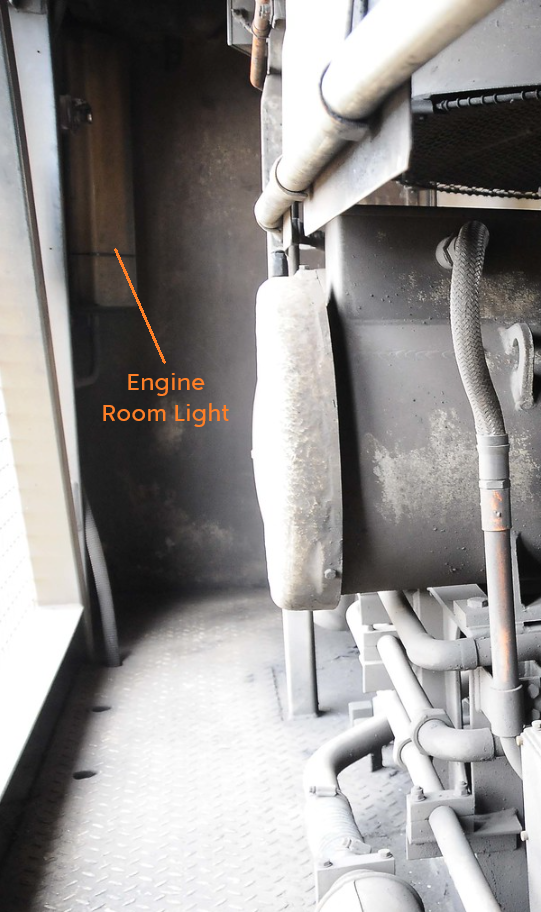
Photo Brian Daniels

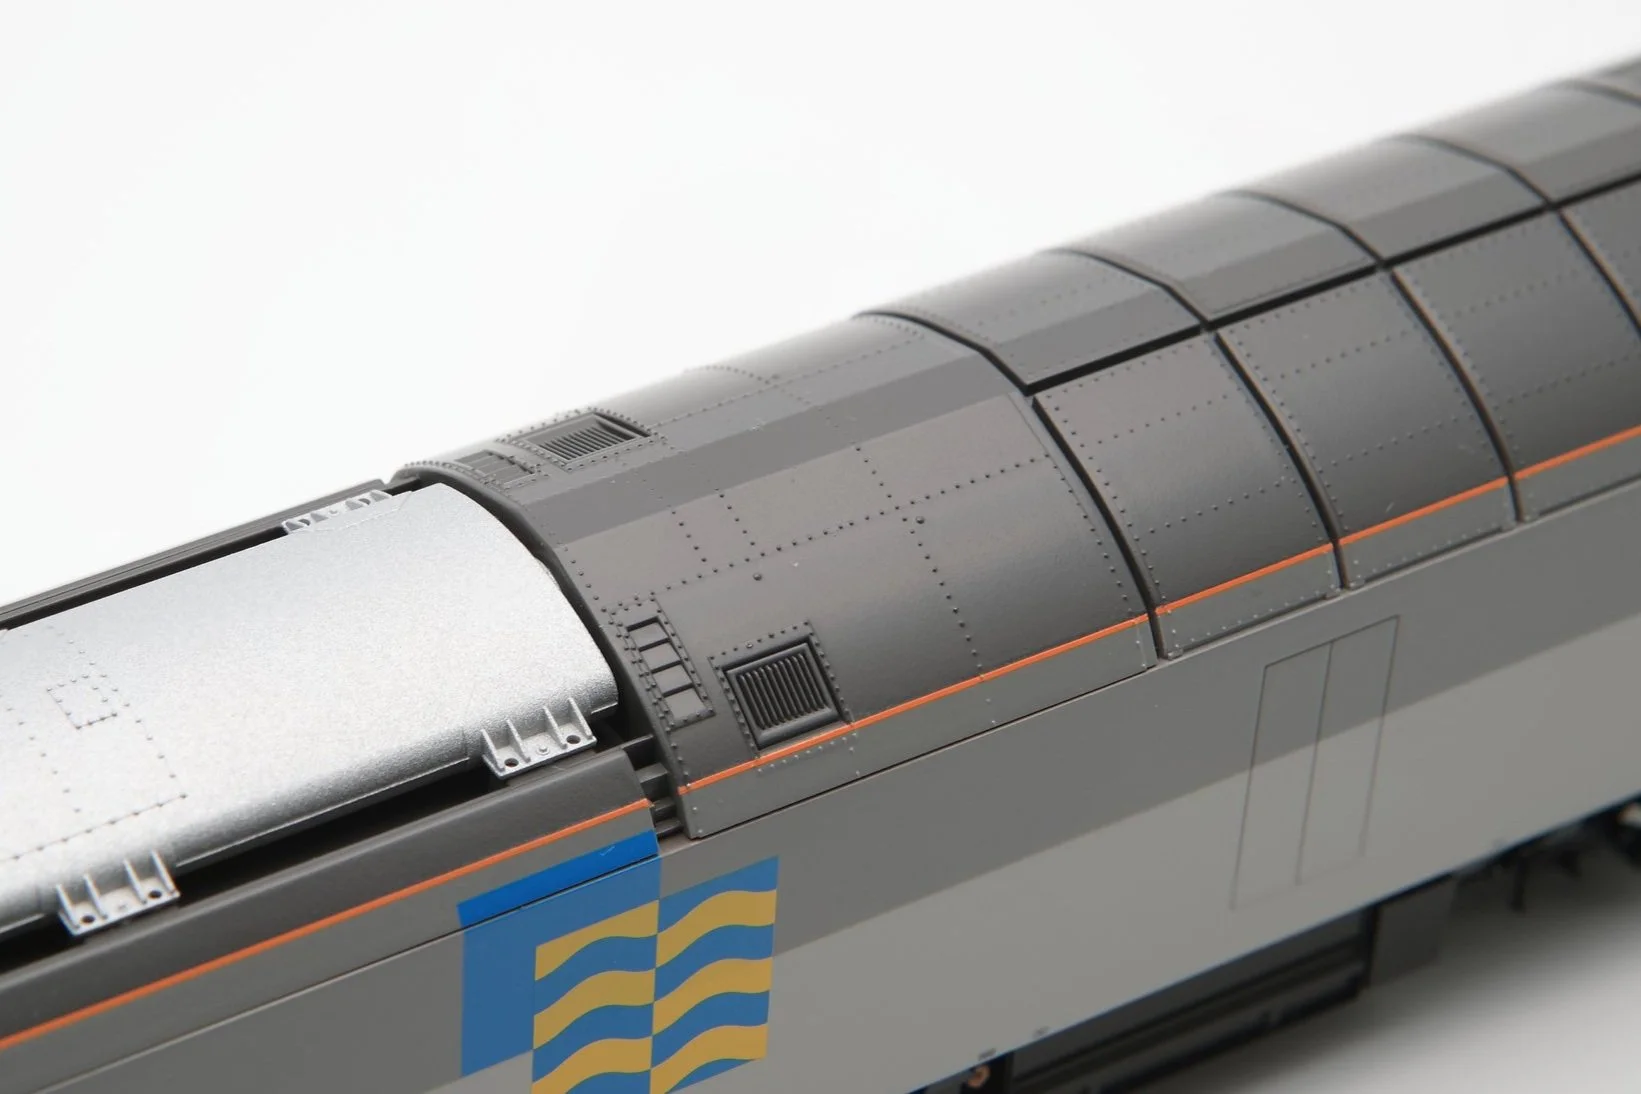
Roof variations
The roof in this area is equally detailed and has the ribbed radiator moulded in behind the fine etched roof grills - in addition the filler cap between them has been rendered in crisp detail as well.
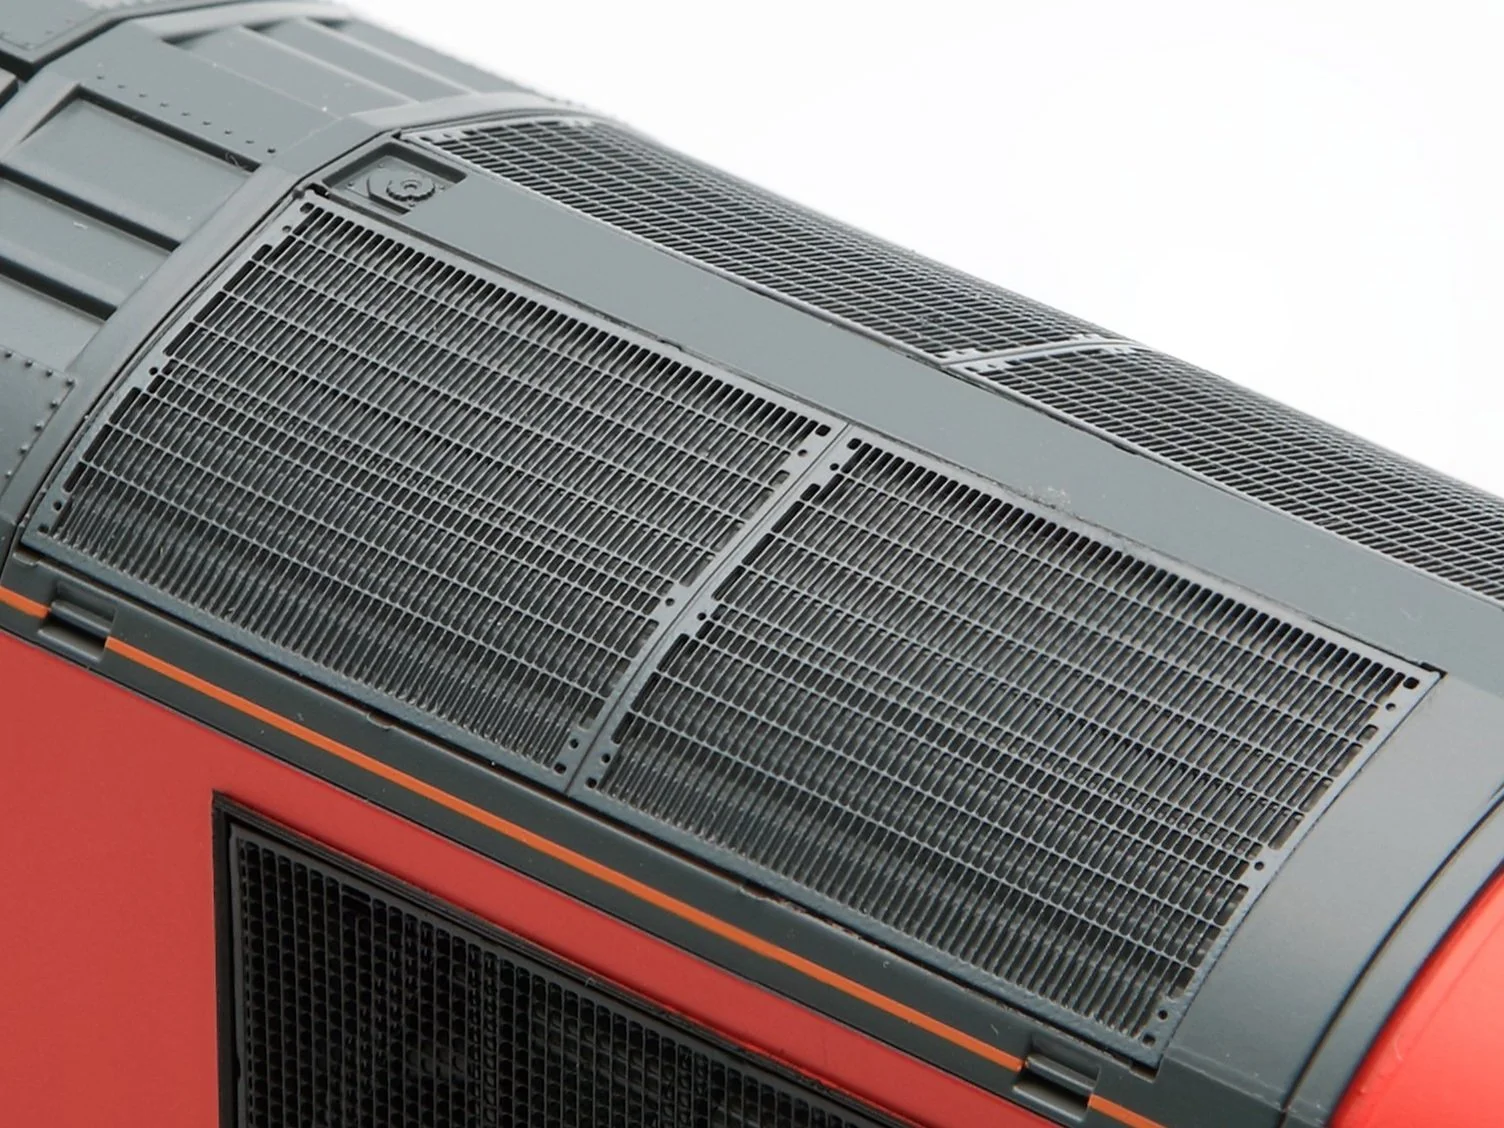

Photo Brian Daniels
Further down the roof, we have accurately produced the roof doors leading to the scavenger vent area of the roof. This area has changed over the years, and as you would expect, we have tooled all of the variations.
As delivered this area was free of any vents at all as shown on our model of 60001.
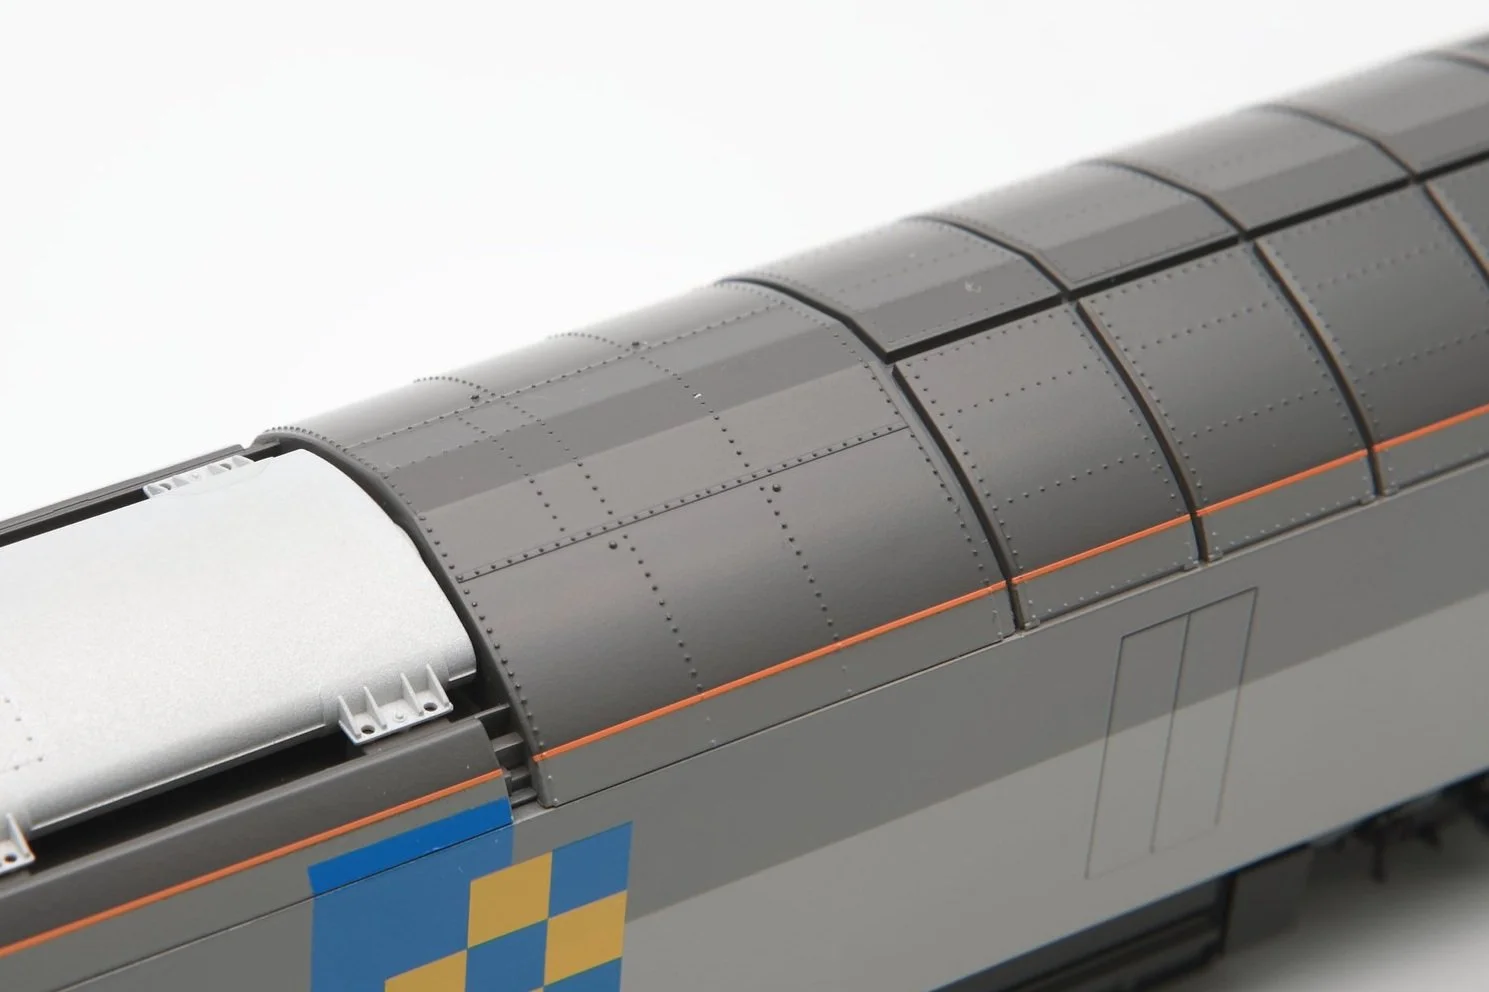
Quite soon after this, scavenger vents were added due to the heat produced by these awesome beasts - this is the configuration present on our triple grey sector locomotives.
During the mid 1990’s a further set of ports were added to the apex of the roof, presenting as two small holes with notches in the roof panels near to the upper crease. All of our locos that are modelled after the late 90’s have this style of roof tooling.

Beyond these variations there is the distinctive exhaust silencer at the No2 end. This has been tooled to match the prototype that was measured at Toton depot during our survey; from an exhaust that was not fitted to the loco at the time and designed according to the assembly drawings from Brush.

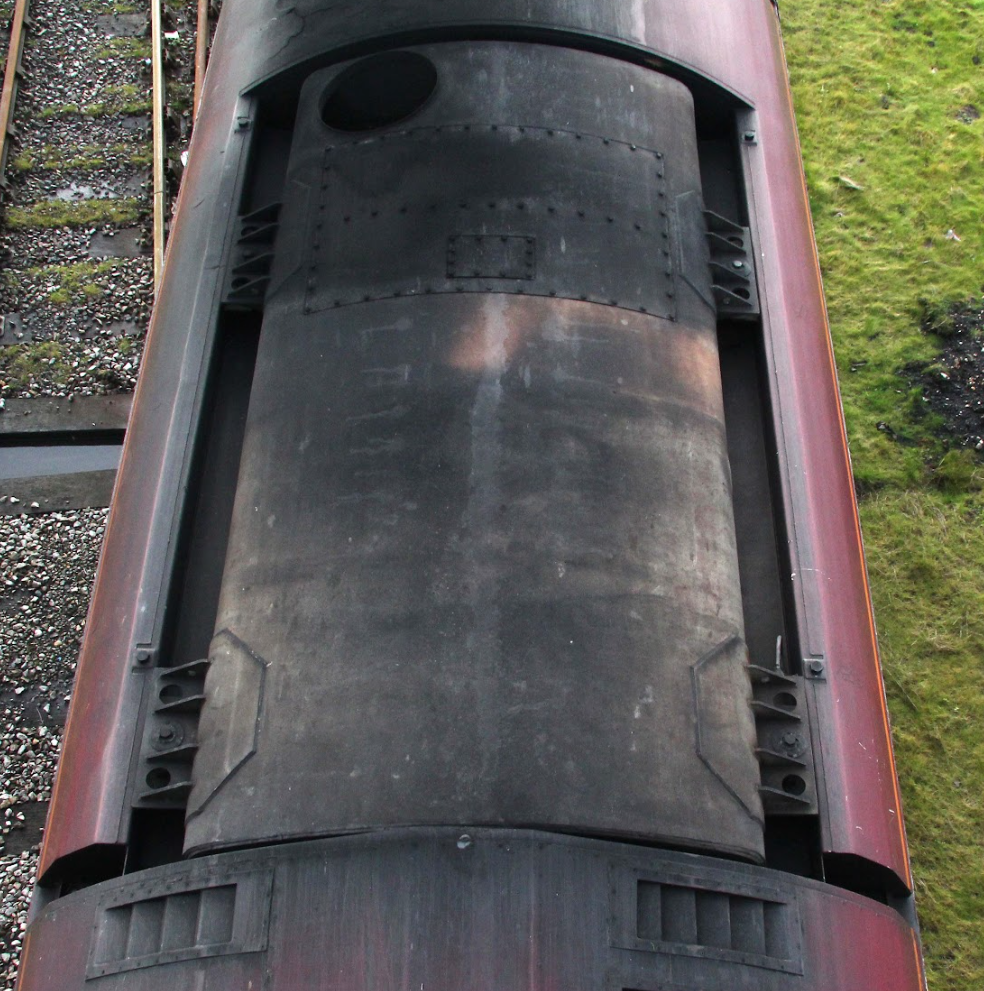
Photo Brian Daniels
In addition to the standard silencer - we have of course tooled up the double exhaust outlets that 60001 had, as delivered.


Moving down the body again we reach the No 2 end clean air intake. As well as the already mentioned fine grille mesh with two stage etch, we have also moulded our chassis block behind to replicate the fine detail of the clean air intakes behind it. The prototype consists of a wall of small round intakes, each with a central pin and swirl vanes around it. Whilst these are incredibly small at 1:76.2 scale, we have still managed to mould in the detail. The swirl vanes had to go, but the round holes with central pin remain, looking very prototypical at this scale with its ‘polo’ shaped holes.


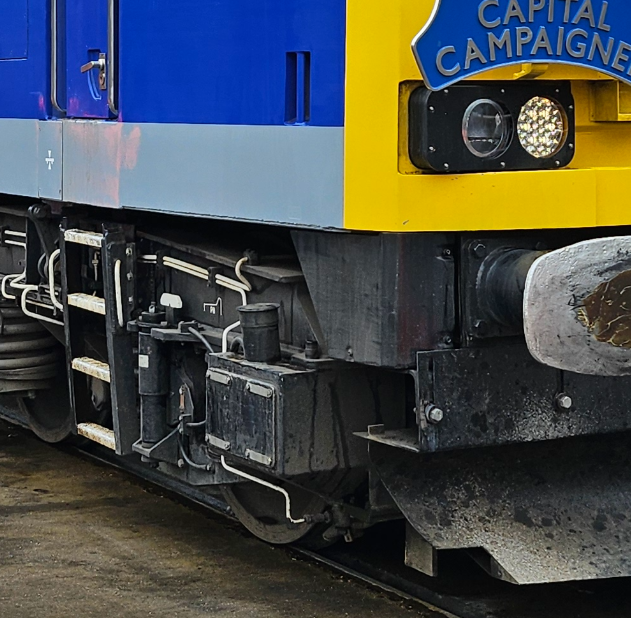
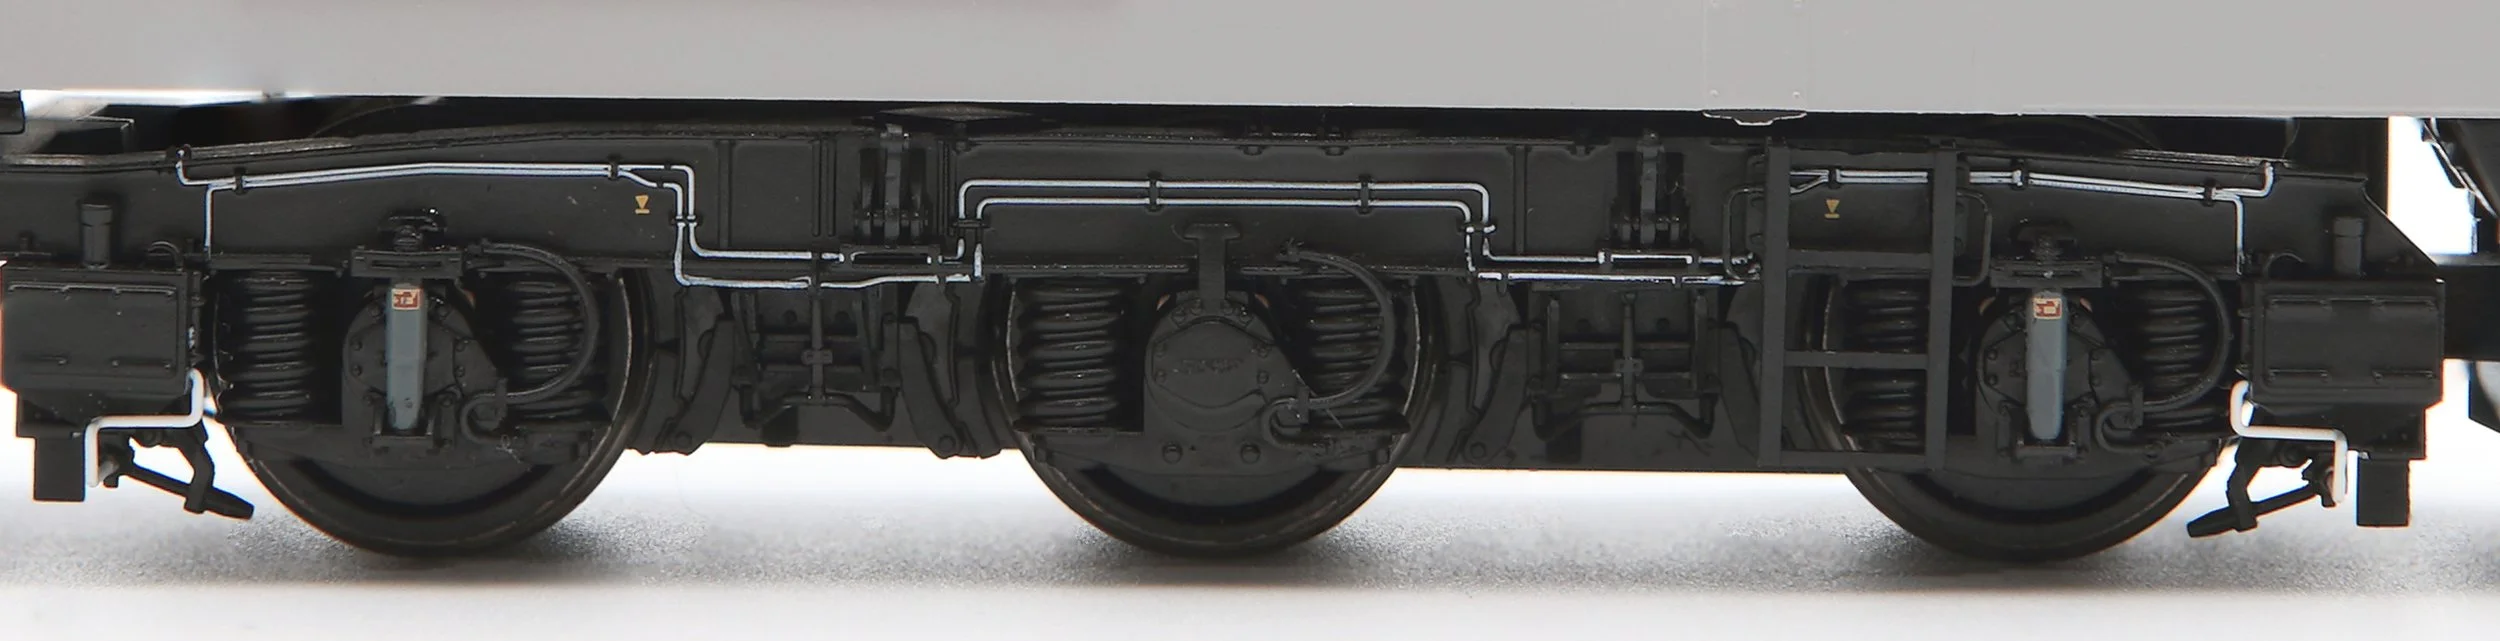
Bogies and Underframe
Starting behind the buffer beams, the detail is faithfully replicated with accurately portrayed sanding gear and pipework, together with the filler pipe that leans outward from the bogie (not straight up as you may expect), complete with separately fitted air vent pipe just like the prototype.

Moving backwards we meet the bogie steps and these, as per the prototype, comprise of four steps with two separately fitted wire handrails. The interesting feature of the steps on the real Class 60, is that the bottom of the steps slope inward toward the bogie looking as if its not fitted correctly - we have of course replicated this on the model together with accurately designed and printed dampers nearby (with printed plates on the dampers differing per the era the locomotive is modelled in).
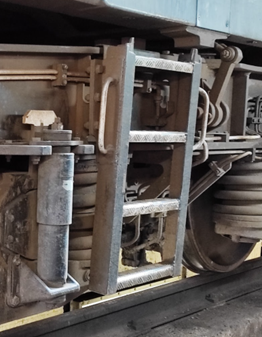
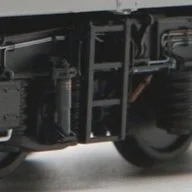

The bogie pipework on the Class 60 is quite complex, very fine and fixed close to the face of the bogie with clamping blocks, replicated on the model by moulding them with crisp, clear tooling, that allows us to represent the differing levels/layers of the pipework as they cross over each other. This can be seen to great effect where the locos handbrake piping, painted in orange/brown, is overlayed above the white piping below - still clamped in the same extended blocks. The routing of this piping over the top of the bogie is completed with a pair of separately fitted wire pipes.

The finely moulded handbrake pipes can be seen to continue down the bogie framework, picked out in orange/brown where the exquisitely rendered brake cylinders and separate wire piping and brake blocks sit between the wheels.
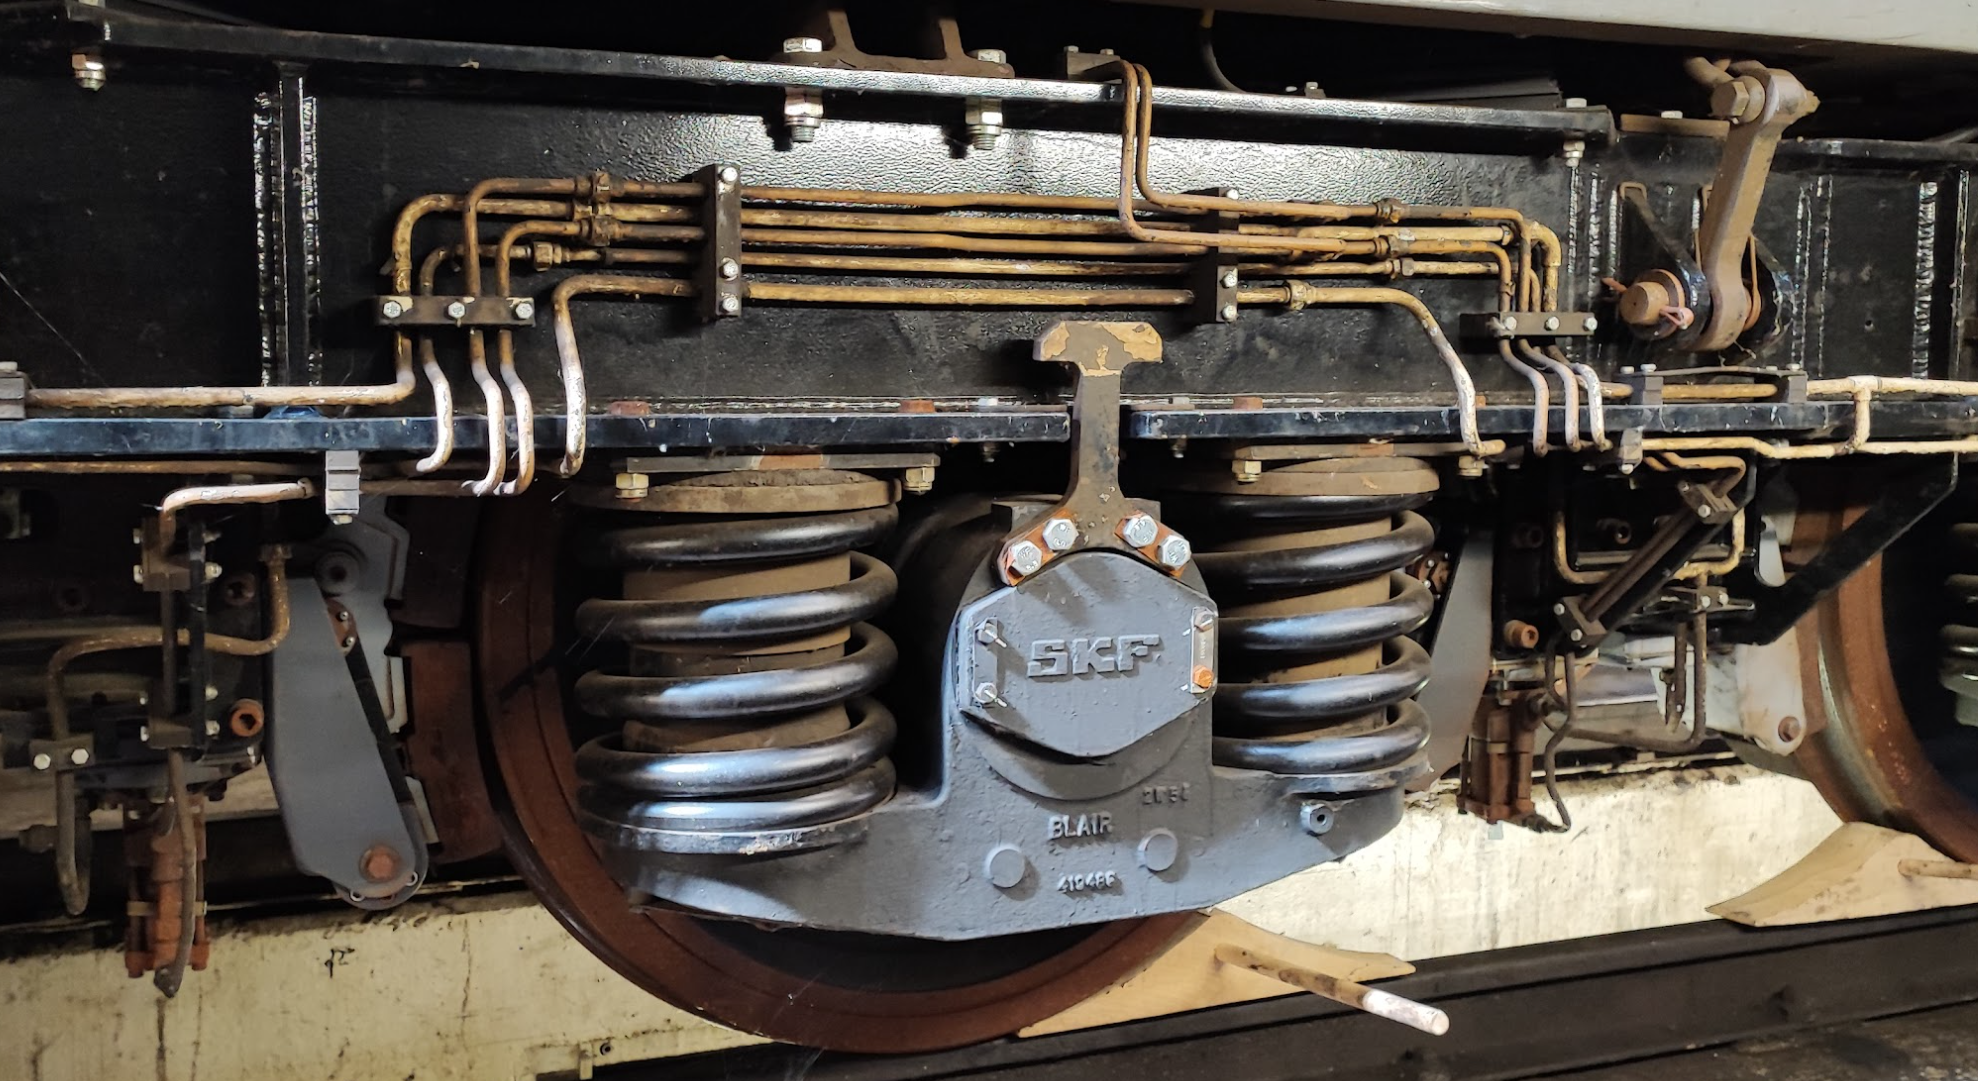

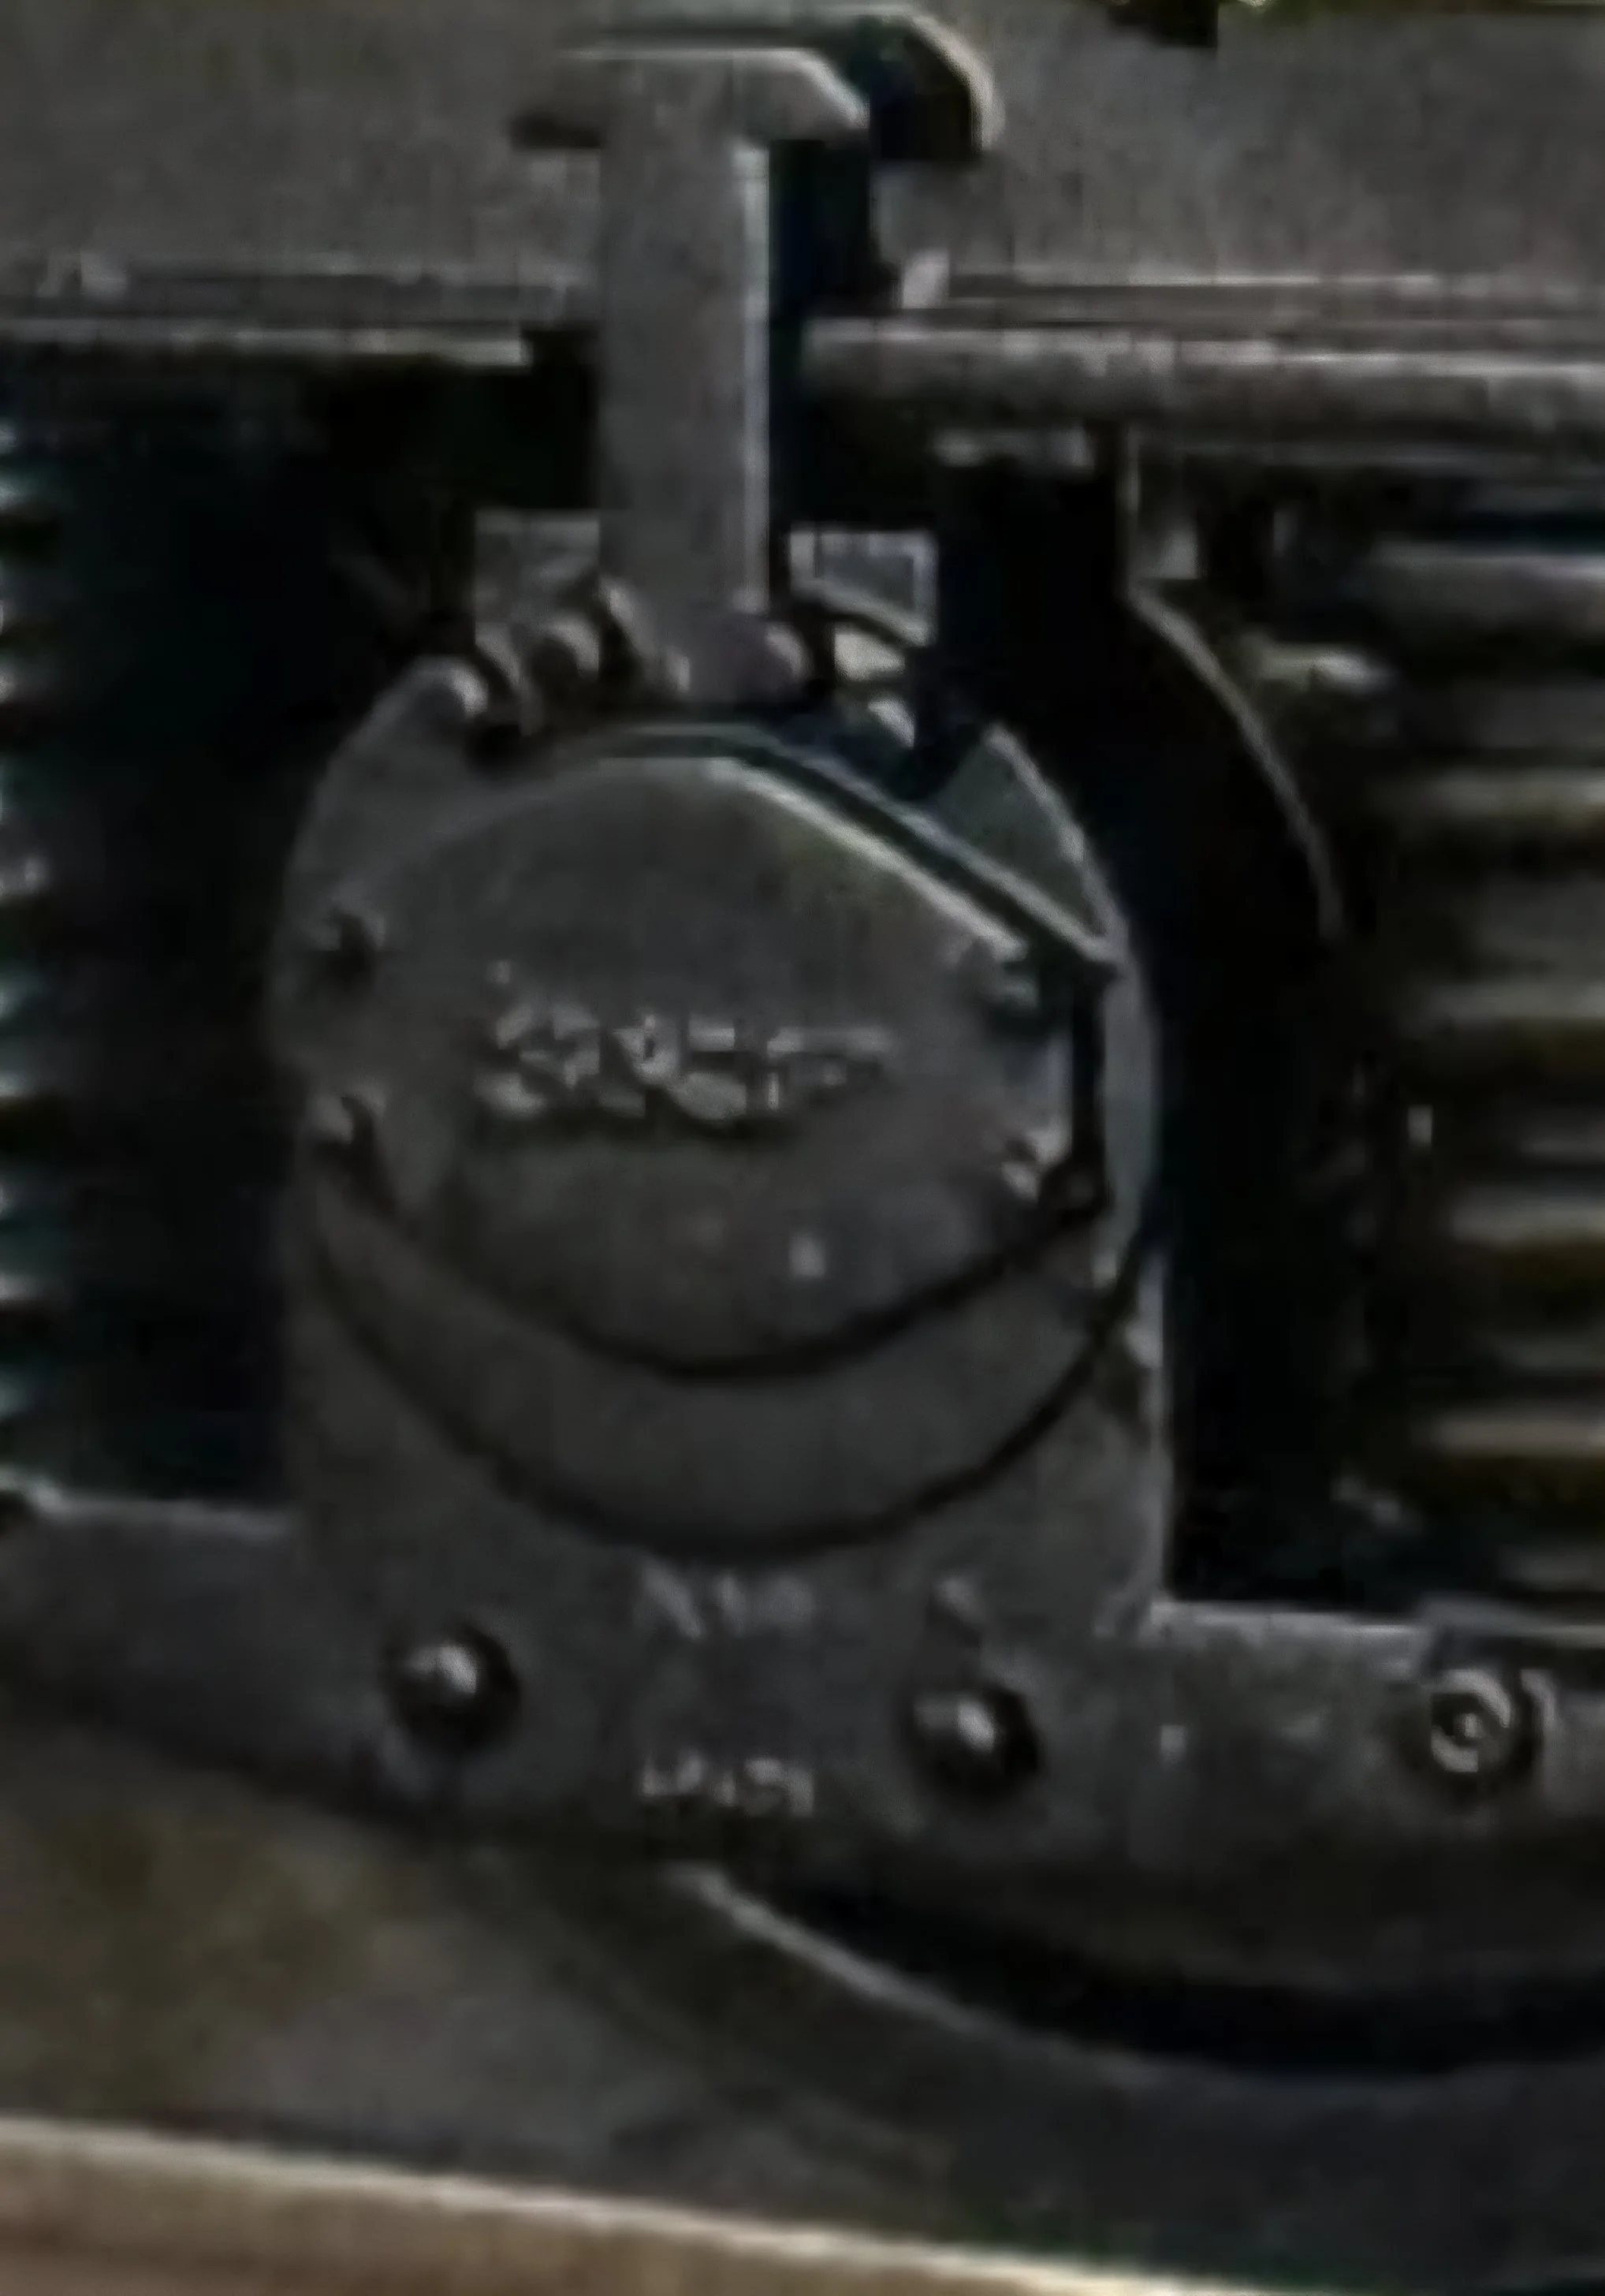
Photo Brian Daniels
Below the pipework we have an exceptionally moulded axle box and spring assembly, that has full relief spring detail both front and back, with crisp bolts and legible ‘SKF’ embellishment on the axle boxes together with the tiny BLAIR and casting number below between the lower pins, which support the prototypically shaped wheelsets.

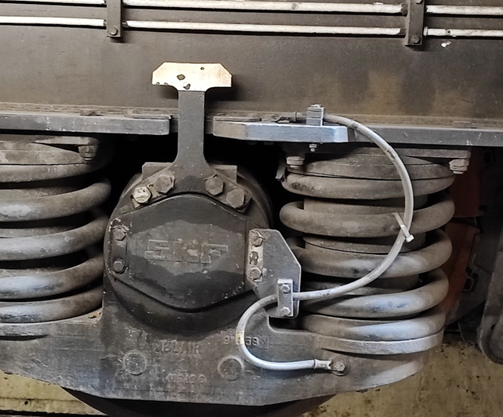
The other side of the bogie is equally impressive, with its more subtle pipework and superfine separately fitted earthing cables (shown above). Moulding these to the springs as one piece was not an option for us, as there is obvious air behind them on the real locomotive. Instead these were tooled as separate items, fitted to the bogies by hand at the factory.
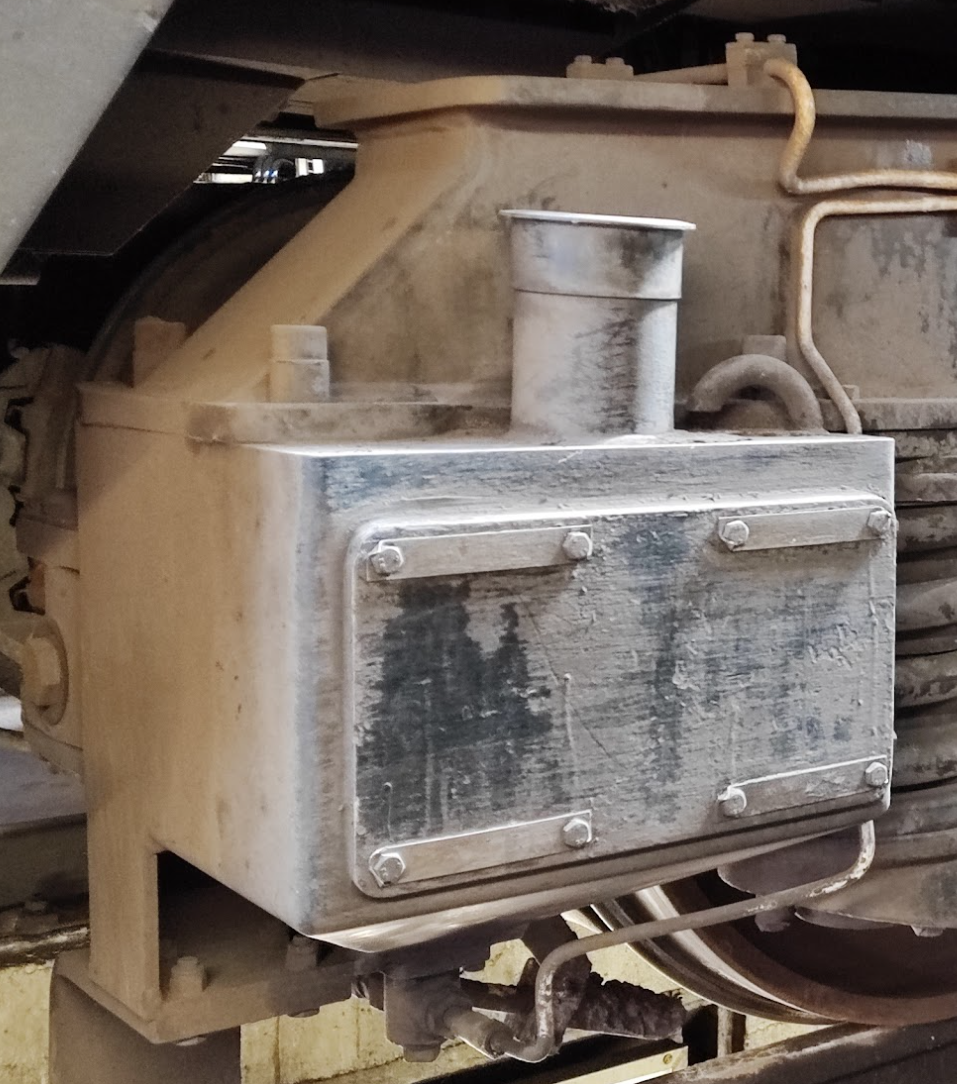
Turning our attention to the battery box area of the locomotive, including the plethora of detail presented between the two bogies, we have replicated the entire assembly which hangs from the racking; from the finely replicated fire extinguishers to the scale moulded BIS switch there is plenty to keep the keen eyed enthusiast entertained. Even the wiring conduits going into the top of these cabinets are faithfully tooled and replicated as separately moulded and fitted detail.
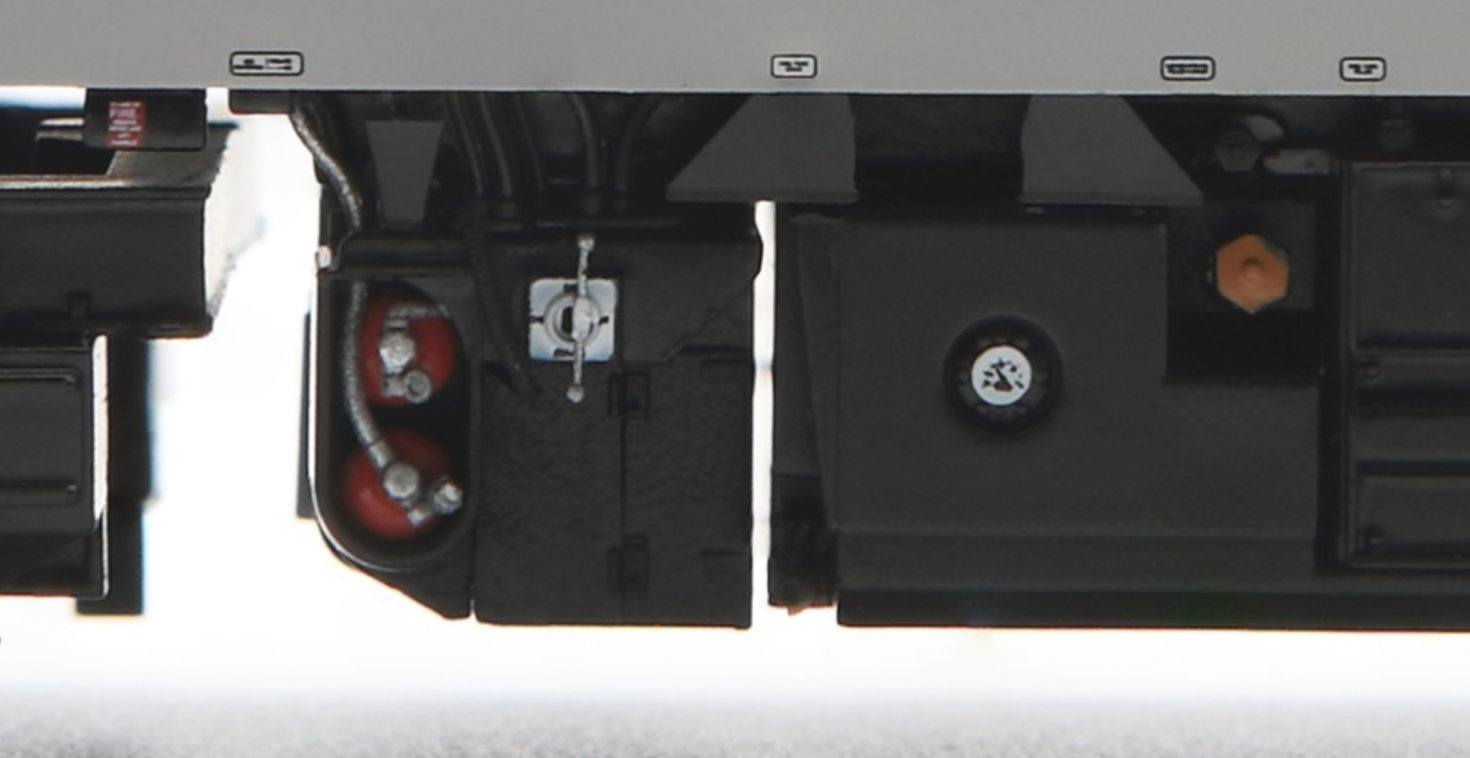
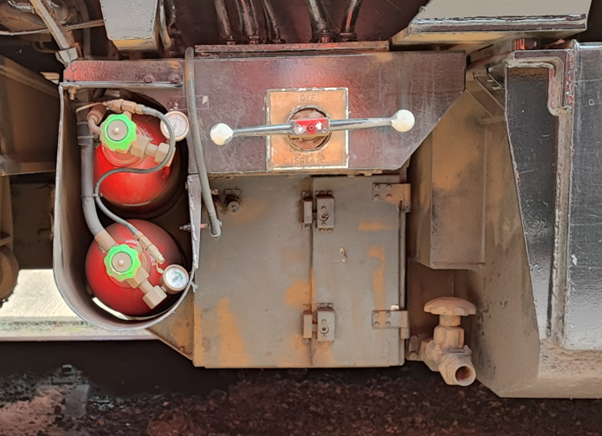
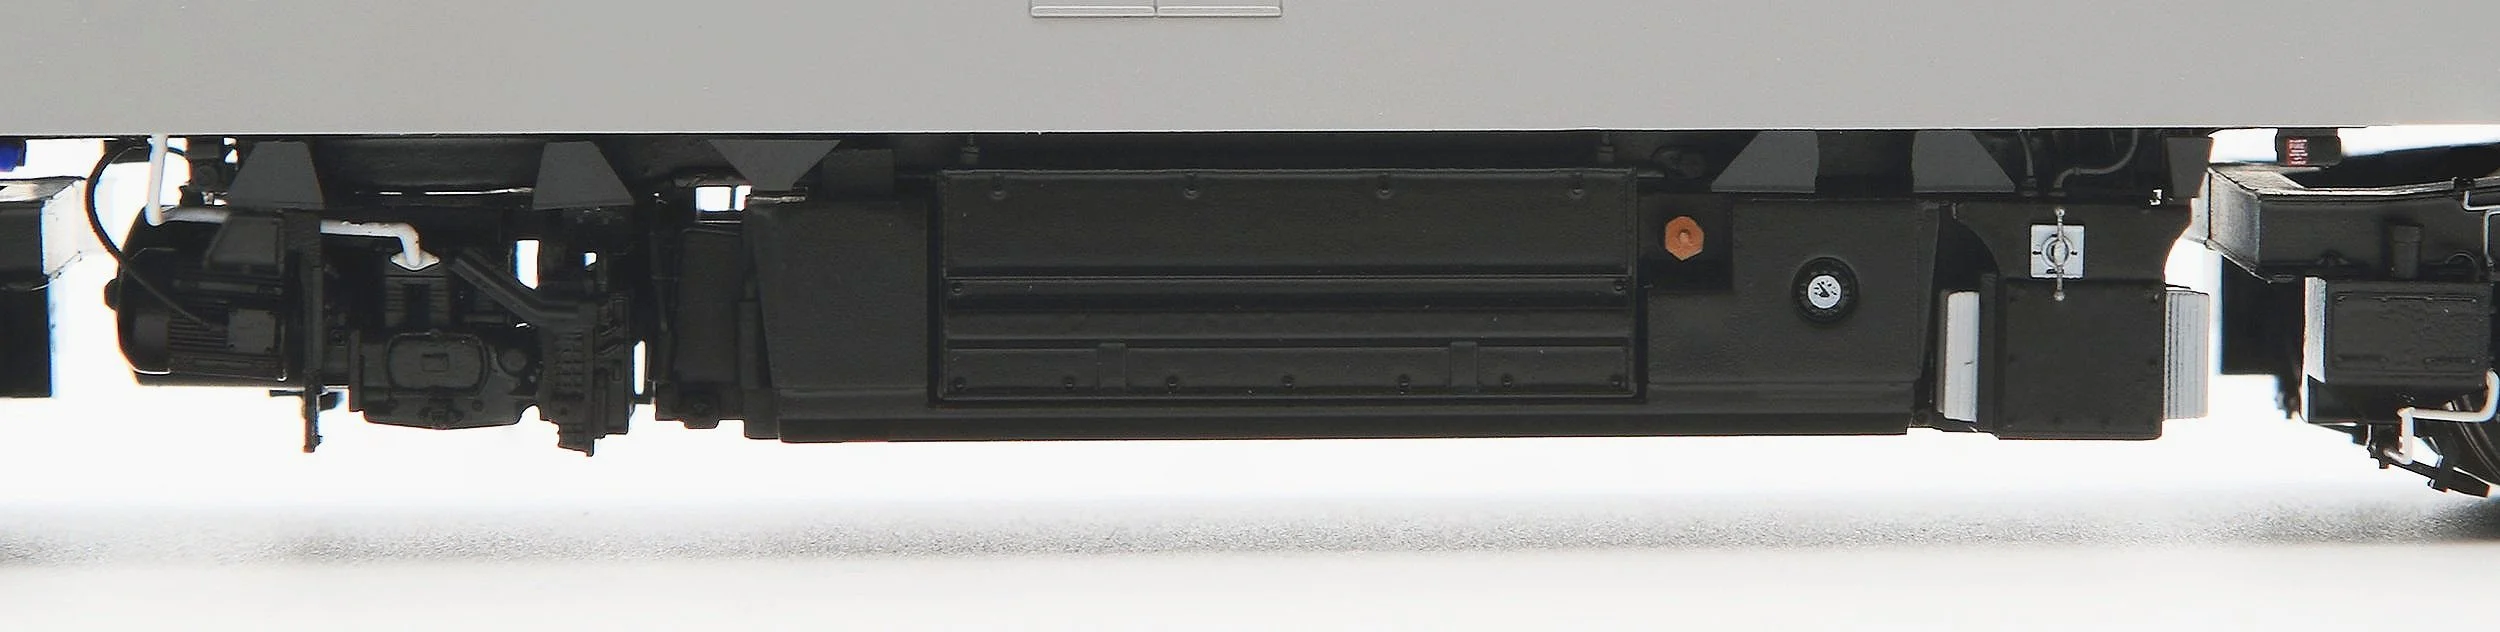
The battery boxes are also reproduced in millimetre perfect detail, with the full relief air compressors at the other end visible from all angles. The connectors and fittings along the bodyside sole bar are also replicated, with the factory doing an impressive job of printing our artwork of the associated labelling. Note the difference between the normal and long range locos below, with the air tank on the left, and the additional fuel tank between the compressors on the right.

Photo Rails of Sheffield

Photo Rails of Sheffield
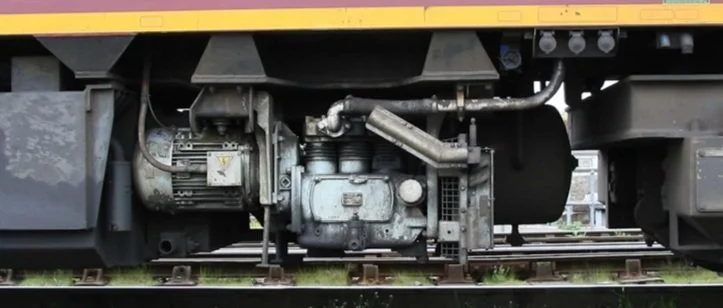
Photo Brian Daniels
Second batch of Cavalex Class 60s - arrived!
Having reviewed the model alongside the meticulous research that has gone into making every detail as accurate as possible, we hope that customers can continue to appreciate what Cavalex are trying to achieve with our models. What we have delivered with this loco has filled our hearts with joy, nostalgia and pride. As avid railway modellers ourselves our ethos has always been one of bringing finescale standards to all customers, allowing everyone to experience the delight of owning a piece of the real railway in miniature.
The following locomotives will be arriving with retailers imminently:
SECTOR ERA MODELS:
60027 - Petroleum Sector
60061 - Coal Sector
60049 - Metals Sector
60017 - Construction Sector
TRANSITION ERA MODELS:
60018 - EWS
60059 - Loadhaul
RETAILER EXCLUSIVES:
60081 - GWR Green - Rails of Sheffield
60098 - Construction Sector - Rails of Sheffield
60034 - Transrail - Ultimate Model Railways
60097 - Transrail - Ultimate Model Railways
The Cavalex 60 is available exclusively from all of our retailers listed below:
AGR Model Railway Store - https://agrmodelrailwaystore.co.uk
Collett’s Models - https://www.collettsmodelshop.co.uk
C&M Models - https://candmmodels.co.uk
John Dutfield - https://www.johndutfieldmodelrailways.co.uk
Rails of Sheffield - https://railsofsheffield.com
Rainbow Railways - https://rainbowrailways.co.uk
Trains4U - http://www.trains4u.com
Ultimate Model Railways - https://ultimatemodelrailways.com
TTC Diecast - https://www.ttcdiecast.com
Cheltenham Model Centre - https://cheltenhammodelcentre.com
Should you have any questions please don’t hesitate to get in touch - cavalexmodels@gmail.com